Header Components
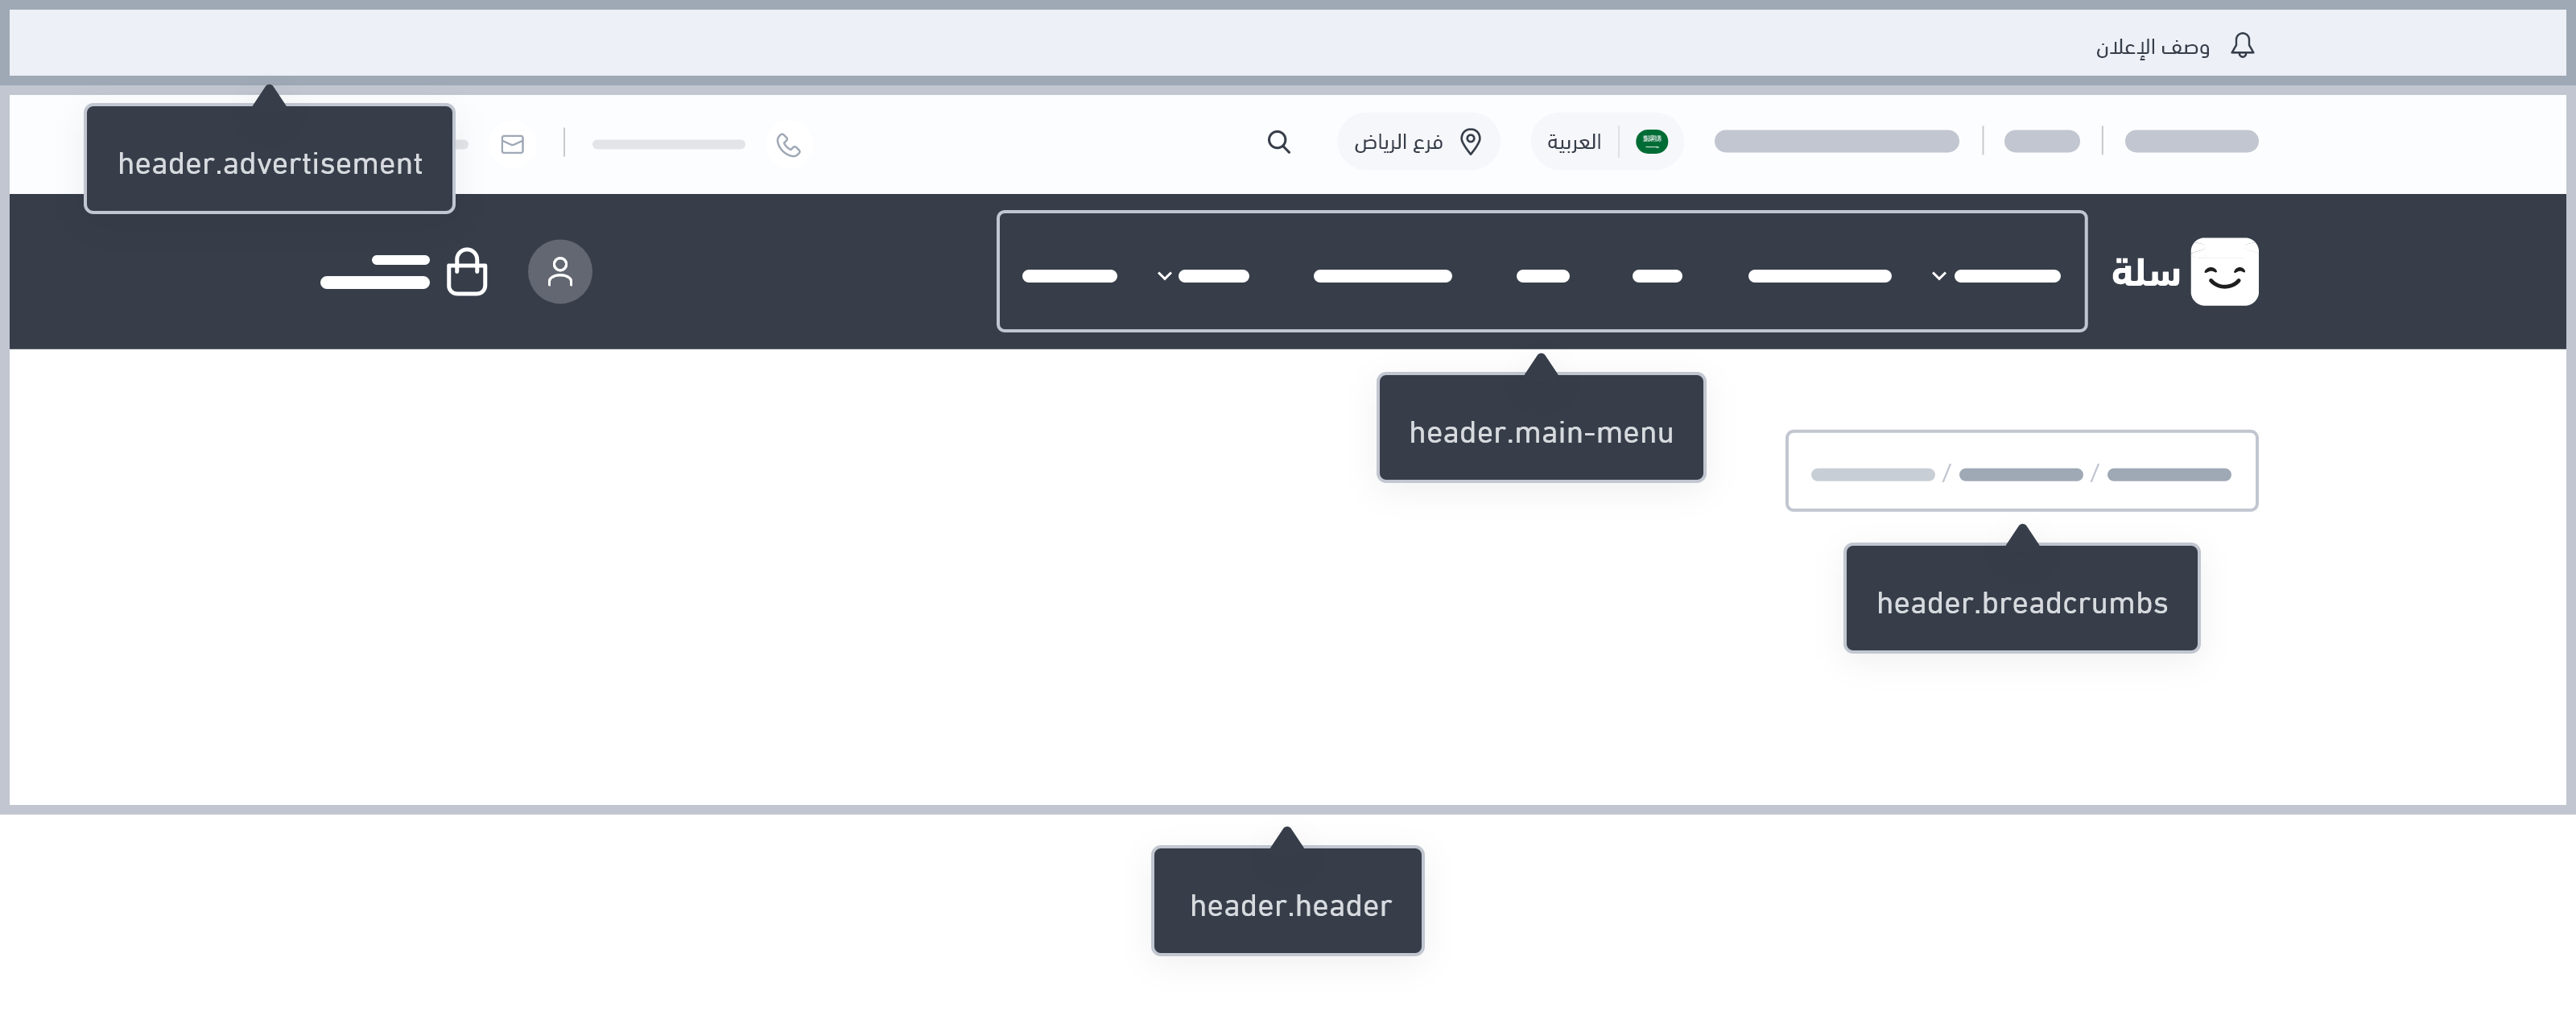
The default header which comes with Twilight includes all of header-related components such as header,breadcrumbs,menu and many more. Developers can easily modify these components, as we see in this article.
Following is the location of the header components:
└── src
  ├── views
    ├── components
    |   ...
    |   └── header
    |       ├── header.twig
    |       ├── advertisement.twig
    |       ├── breadcrumbs.twig
    |       ├── menu.twig
    |       ├── menu-item.twig
        ...
Header Components Example
In the following example we can see that the header includes:

Header
This part is the main component of the header which embeds several parts, such as breadcrumbs and main menu.
{% component "header.header" %}
Troubleshooting Tip
The header design can occasionally be hidden. You can see twilight::errors in the browser's console logs, where you can investigate the problem. The following illustrates the error as follows:
Array to string conversion in File [src/views/components/header/header.twig] at line 7
The below code should solve the issue:
  {% set nav_type = theme.settings.get('your_arrayable_key') %}
  {% if nav_type is iterable %}
  {% set nav_type = nav_type|first %}
  {% endif %}
The line {% set nav_type = theme.settings.get('your_arrayable_key') %} retrieves the value of a setting from the Twilight theme settings. The developer needs to replace your_arrayable_key with the actual key representing the setting that contains the array.
By using this code, the developer handles the scenario where nav_type is an array. If it is an array, you are setting nav_type to its first item. This way, you avoid the error related to converting the array to a string.
:::tip[Educational Clip]
:::
Advertisement
This component receives an object representing an advertisement's text, and then displays its details.
{% component "header.advertisement" %}
Variables
Usage
Using the advertisement object, we can get the details of advertisement.icon, advertisement.url, advertisement.description, and so on. The developer can use these data within any style designed by them.
{% if advertisement.icon %}
  <span class="{{ advertisement.icon }}"></span>
{% endif %}
{% if advertisement.url %}
  <a href="{{ advertisement.url }}" {% if advertisement.is_new_window %} target='_blank' {% endif %}>
    {{ advertisement.description }}
  </a>
{% else %}
  {{ advertisement.description }}
{% endif %}
Breadcrumbs
Breadcrumbs are a set of links that indicate the current page and its "ancestors" (parent, grandparent, and so on), usually leading back to the site's homepage.
{% component "breadcrumbs" %}
Variables
Usage
This component receives breadcrumbs , which is an array of breadcrumb described by their title and url. A loop goes through this object and display its parts. Developer has the option to edit the look-and-feel of this object.
{% for breadcrumb in breadcrumbs %}
    {% if not loop.last %}
        <li><a href="{{ breadcrumb.url }}" class="...">{{ breadcrumb.title }}</a></li>
        <li><i class="..."></i></li>
    {% else %}
        <li><span class="...">{{ breadcrumb.title|raw }}</span></li>
    {% endif %}
{% endfor %}
Menu
This component represents the store's main menu, which is usually for the store categories pages. It's considered as the primary roadmap for the customers to the store's internal categories. It comes with many options, such as a list of products to be displayed on the menu.
{% component "header.menu" %}
Variables
Usage
For this component, the object menus contains the details of each item in the menu. Using a loop these menu items can be displayed.
<ul>
    {% for menu in menus %}
        <li {{ menu.attrs }}>
            {% if menu.has_children %}
                <span>{{ menu.title }}</span>
                <ul>
                    <li><a href="{{ menu.url }}">{{ menu.title }}</a></li>
                    {% for submenu in menu.children %}
                        {# to make sure you are support three level of item you can use _self to render the same #}
                        {# twig file again and again for each level #}
                        {% include _self with {menu:submenu} %}
                    {% endfor %}
                </ul>
            {% else %}
                <a {{ menu.link_attrs }} href="{{ menu.url }}">{{ menu.title }}</a>
            {% endif %}

            {% if menu.mega_menu %}
                <div class="product-item-menu">
                    {% for product in menu.mega_menu|slice(0, 4) %}
                        <a href="{{ product.url }}">
                            <img src="{{ product.image.url }}" alt="{{ product.image.alt }}"/>
                            {% if product.promotion_title %}
                                {{ product.promotion_title }}
                            {% endif %}
                        </a>
                        <h3>
                            <a href="{{ product.url }}">{{ product.name }}</a>
                        </h3>
                        {% if product.on_sale %}
                            <div>
                                <h4>{{ product.sale_price|money }}</h4>
                                {{ product.regular_price|money }}
                            </div>
                        {% else %}
                            <h4>{{ product.price|money }}</h4>
                        {% endif %}
                    {% endfor %}
                </div>
            {% endif %}
        </li>
    {% endfor %}
</ul>
:::tip[Educational Clip]
:::
Menu Item
The Menu Item component plays a vital role in navigation and user experience. It helps create dynamic menus by organizing individual menu items.
Usage
The menu item component is used for both mobile and desktop devices. It generates menu items with corresponding links and handles child menu items and associated products, adapting to different screen sizes.
{# MOBILE #}
    <li  {{ menu.attrs }}>
        {% if not menu.has_children %}
            <a {{ menu.link_attrs|raw }} href="{{ menu.url }}>{{ menu.title }}</a>
        {% else %}
            <span>{{ menu.title }}</span>
            <ul>
                <li><a {{ menu.link_attrs|raw }} href="{{ menu.url }}>{{ menu.title }}</a></li>
                {% for submenu in menu.children %}
                    {% include _self with {menu:submenu} %}
                {% endfor %}
            </ul>
        {% endif %}
    </li>

{# DESKTOP #}
    <li    {{ menu.attrs|raw }}>
        <a {{ menu.link_attrs|raw }} href="{{ menu.url }}">
            <span>{{ menu.title }}</span>
        </a>
        {% if menu.has_children %}
            <div>
                <ul>
                    {% for submenu in menu.children %}
                        {% include _self with {menu:submenu, is_root_menu:false} %}
                    {% endfor %}
                </ul>
                {% if menu.products %}
                    <div class="grow p-8">
                        <div class="grid gap-4 grid-cols-4">
                            {% for product in menu.products|slice(0, 4) %}
                                <salla-product-card shadow-on-hover product="{{product}}"></salla-product-card>
                            {% endfor %}
                        </div>
                    </div>
                {% endif %}

            </div>
        {% endif %}
    </li>
