OAuth is a widely adopted authorization framework that allows you to consent to an App interacting with another on your behalf without having to reveal Merchant's sensitive data, such as passwords.If you are building integrations that require access to Salla on behalf of other Salla Merchants, you should utilize OAuth 2.0 Protocol for Salla. You can use OAuth in gaining access to Merchants' stores with either Easy Mode or Custom Mode, using access tokens via the Apps built on Salla Partners Portal, which will be published on Salla App Store.
Salla OAuth Format All calls to the Merchant Public APIs require an Authorization header in this format: Authorization: Bearer <ACCESS_TOKEN>
Apps are given authorized access, which means they can only access resources that the Merchant has authenticated.
⛓️💥 Revoke Access
The App's authorized access can be revoked at any time by the Merchant by disconnecting the App from the dashboard on Salla Partners.
⌛️ Time Limit
OAuth 2.0 access tokens have a time limit. Merchant data will be compromised only until the access token is valid if the App encounters a security breach.
The OAuth 2.0 authorization flow is the initial step in installing an App on the Salla platform. By requiring the merchant to grant permission for the App to access their data within specific scope, this process helps to ensure that the store's data is safe and private. The OAuth 2.0 authorization procedure can be started by one of the following URLs:
The Authorization URL: https://accounts.salla.sa/oauth2/auth
The Installation URL: https://s.salla.sa/apps/install/{app-id}
The OAuth 2.0 authentication flow for installing an App on a Salla Store includes crucial URLs and endpoints that enable permission granting, code-to-token exchange, redirection, and token refreshing. The process involves the merchant's redirection to the Salla Authorization Server, login, granting permission, and obtaining an access token for API requests and accessing store data.The following table summarize these and endpoints:
URL
Description
Authorization Endpoint
https://accounts.salla.sa/oauth2/auth This URL initiates the process of obtaining the merchant's permission for the App to access their store data on Salla.
Token Endpoint
https://accounts.salla.sa/oauth2/token After the merchant grants permission, the App exchanges the authorization code for an access token at this endpoint.
Redirect URI
https://client-app.com/callback Once the authentication process is complete, the authorization server redirects the user's browser to the registered redirect URI.
Refresh Token Endpoint
https://accounts.salla.sa/oauth2/token If a refresh token is granted, this endpoint allows the client to obtain a new access token when the current one expires.
User Info Endpoint
https://accounts.salla.sa/oauth2/user/info Once the authentication process is completed successfully, the Merchant details can be received via this endpoint.
In addition to the base URLs mentioned above, OAuth 2.0 also uses query parameters to pass information during the authentication process. These query parameters serve different purposes and are included in the URLs when making requests to the authorization and token endpoints. Here are some common query parameters used in OAuth 2.0:
Query Parameter
Description
Example
client_id
Identifies the client application making the request, which values can be fetched from your application on the Salla Partners Portal.
1311508470xxx
client_secret
Identifies the client application making the request, which values can be fetched from your application on the Salla Partners Portal.
362985662xxx
response_type
Specifies the desired response type from the authorization server.
code
redirect_uri
Indicates the URI for user redirection after completing the authorization process.
It is common practice to include the client ID as a query parameter in the authorization URL for OAuth 2.0 authentication. This inclusion allows the authorization server to associate the authentication request with the specific client, ensuring client identification and authentication during the process. Here's an example of how the client ID can be included in the authorization URL:
In the example above, client_id=your_client_id is appended to the authorization URL, where your_client_id should be replaced with the actual client ID issued by the authorization server.
Including the client ID as a query parameter in the authorization URL ensures authentication and identification of the client during OAuth 2.0. If the App has been previously approved, scope approval steps may be skipped, streamlining the process.
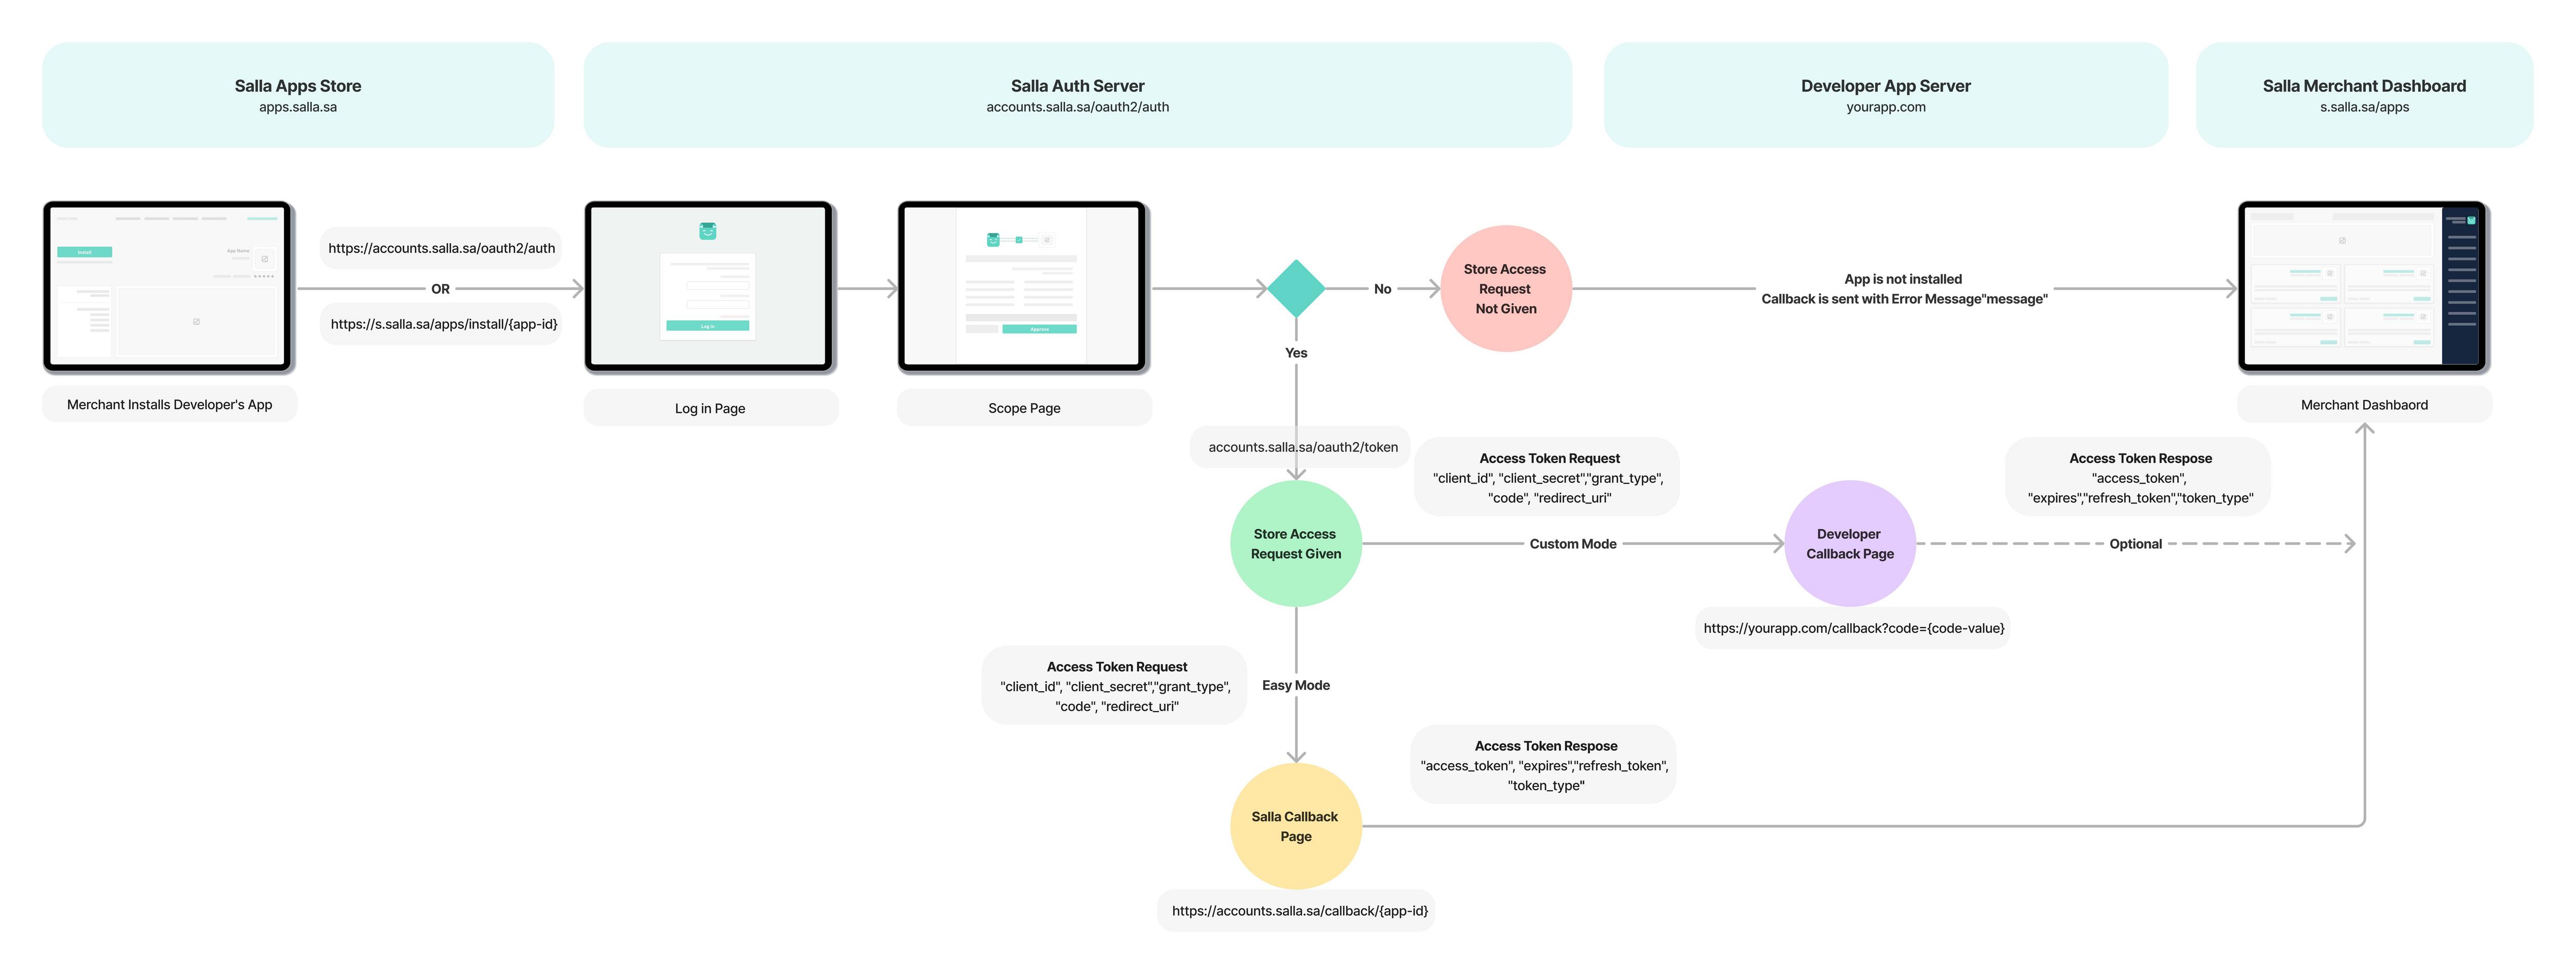
On the other hand, the installation URL allows for the immediate installation of the App to the merchant store. Unlike the typical authorization URL, the installation URL simplifies the app installation process by providing a direct URL with the app-id as a parameter. This URL can be used to initiate the app installation process. When the merchant clicks on the installation URL, the App will be automatically installed into their Salla Store.The following diagram explains the flow of OAuth 2.0 in Salla, which will eventually result in access token generation.
On Salla Partners Portal, and when you are creating your App, inside the App page details within the App Keys section, you will be provided with two methods for the OAuth protocol:
Easy Mode, which is a simplified version of the protocol that requires minimal setup.
Custom Mode, which allows for more advanced, manual configuration and the use of callback URLs.
One of the foremost options of authorization via OAuth 2.0 in Salla Partners is Easy Mode Authorization. Utilizing Salla’s easy mode option, you can get the “access token” in one step automatically. It allows you to listen to the event, app.store.authorize, and then the process of generating the “access token” will be handled automatically at Salla‘s side back to you via the Webhook URL specified in the Webhooks/Notificationsyour of your App.By selecting the Easy Mode Authorization option, Salla will handle everything, including extracting the authorization code and providing the client id and secret key together with the auth code to generate an access token. In the end, you will receive all of the above data in the form of a payload that contains a new access token generated for you, as the life validity of access tokens with Salla is 2 weeks.The payload you will be receiving should look something like this:
In the easy mode, when the Merchant updates the app, Salla sends you the app.updated event. After that, Salla sends you the app store.authorized event, which provides you with the new access token and refresh token. This information will be delivered to you via webhook. Accordingly, you are required to update the access token and refresh token in your database.
WARNING
The expires variable is returned as a unix timestamp value for the app event app.store.authorize.
When implementing an OAuth flow or any other third-party API that needs to redirect to the App after authentication or authorization, a callback URL should be set. The App will use this URL to reroute back to the App after the login and App scopes' permission procedures are finished. This cycle of authentication is called Custom Mode authentication.
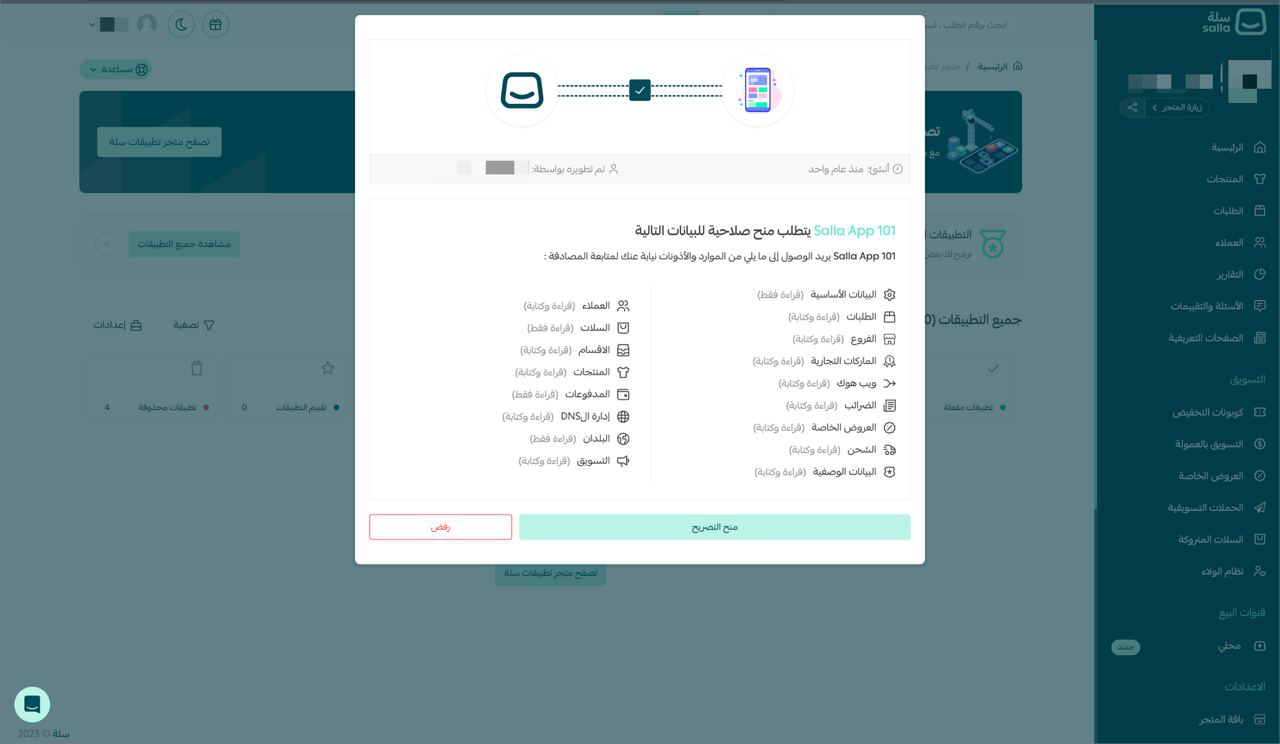
A Merchant has to authorize your App, with the set of App scopes, to be able to proceed with the process of obtaining the access token. Direct the Merchant to the callback URL you used while setting up your App on Salla Partner Portal. If this is the first time that you are requesting authorization from a Merchant, the merchant will be asked to log in to his/her Salla Store.To obtain the access token for your App, the Merchant needs to authorize it with the App scopes. Once the Merchant has logged in to their Salla Store account, they will be prompted by Salla to authorize access to your App. The merchant will be asked to grant authorization for your App to access their store data with the defined scopes. If the access has been authorized, the user will be redirected to the Callback URL with the authorization code in the code query parameter, which you can fetch to continue the process of obtaining the access token:https://yourapp.com/callback?code={code-value}&scope={app-scopes}+offline_access&state={state-value}
When the Merchant authorizes the App, Salla returns the Merchant to your Callback URL with a code parameter containing an authorization code. Use the code in your access token request, which is a POST request with the required parameters to the token endpoint.
Access Token Request
Access Token Response
Easily run the request straight from Postman by providing the required data to generate an access token
WARNING
Easy Mode is the only way allowed for published apps on the Salla App Store. Since Postman uses custom mode, you can implement that in your app for testing purposes only.
The following enlists the values that are sent to the User Authorization endpoint to generate an access token:
AccessToken
client_id
string
required
A unique identifier assigned to an application or service that interacts with another service or platform
client_secret
string
required
A Salla Partners App Client Secret Key is a confidential security credential that is used to authenticate your application with the Salla platform.
grant_type
string
required
Acredential that allows a client application to access protected resources on behalf of a user using authorization_code
code
string
required
Code fetched at authorization
scope
string
required
The specific permissions granted to a client application when it uses an access token to access protected resources on behalf of a user using offline_access.
• If you want to generate the refresh token, set the scope value as offline_access. E.G: scope = offline_access.
• The expires variable is returned as seconds timestamp value
• Upon obtaining the access token, developers can utilize the User Info endpoint URL, https://accounts.salla.sa/oauth2/user/info, to retrieve the Merchant details and store them alongside the access tokens.
A typical reason for refreshing a token is that the original access token has expired, which lasts for only 14 days (2 weeks). If you would like to request a new access token, you may do so by sending Salla’s authorization server a token refresh request. Refresh tokens are single-use only, meaning they become invalid after the first use.Every time a developer uses a refresh token to request a new access token, a new refresh token is issued, and the previous token is invalidated. This mechanism adds an extra layer of security, making it more difficult for attackers to use stolen refresh tokens. A refresh token lasts for 1 month, and attempting to use it twice invalidates the associated access token.
Warning: Refresh Token Reuse
Reusing refresh tokens in parallel processes or making multiple simultaneous refresh requests can lead to complete authentication failure. When a refresh token is used more than once, Salla's OAuth server will:
Invalidate the refresh token
Revoke all access tokens obtained with it
Reject all subsequent authentication attempts using that refresh token
Requires the Merchant to reinstall the application from the Salla App Store for you to regain access to their data.
This security measure is implemented in accordance with RFC 6819 Section 5.2.2.3 to prevent replay attacks.
Recommended Implementation: To prevent refresh token reuse in your application, implement a mutex/locking mechanism for token refresh operations
Now you may use the access token to make requests, on behalf of the Merchant, from the resource server via the API (base endpoint url: https://api.salla.dev/admin/v2/). For more information about making API requests, the full API documentation is available here.With the access token and the authroized App scopes to the App, you may start consuming any of Salla's API endpoints, such as fetching a list of brands
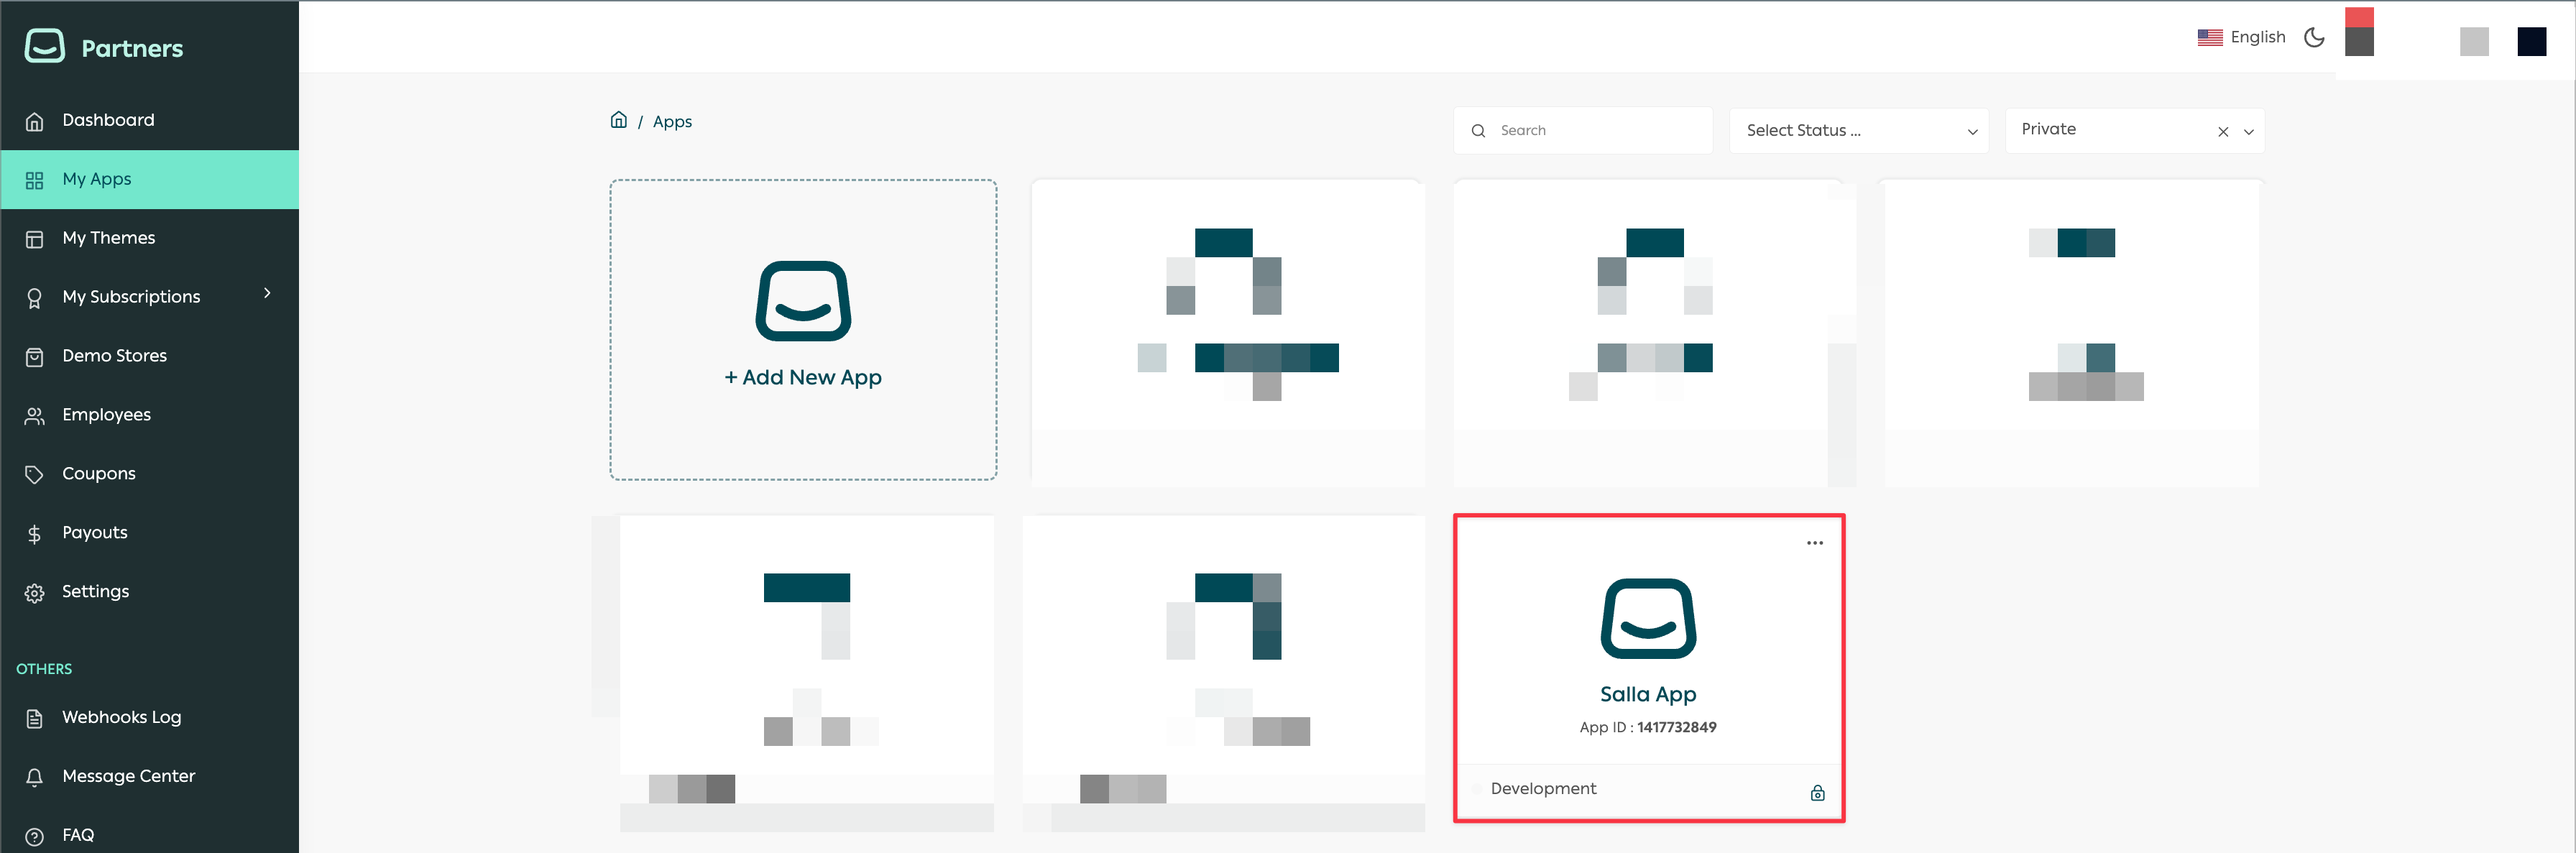
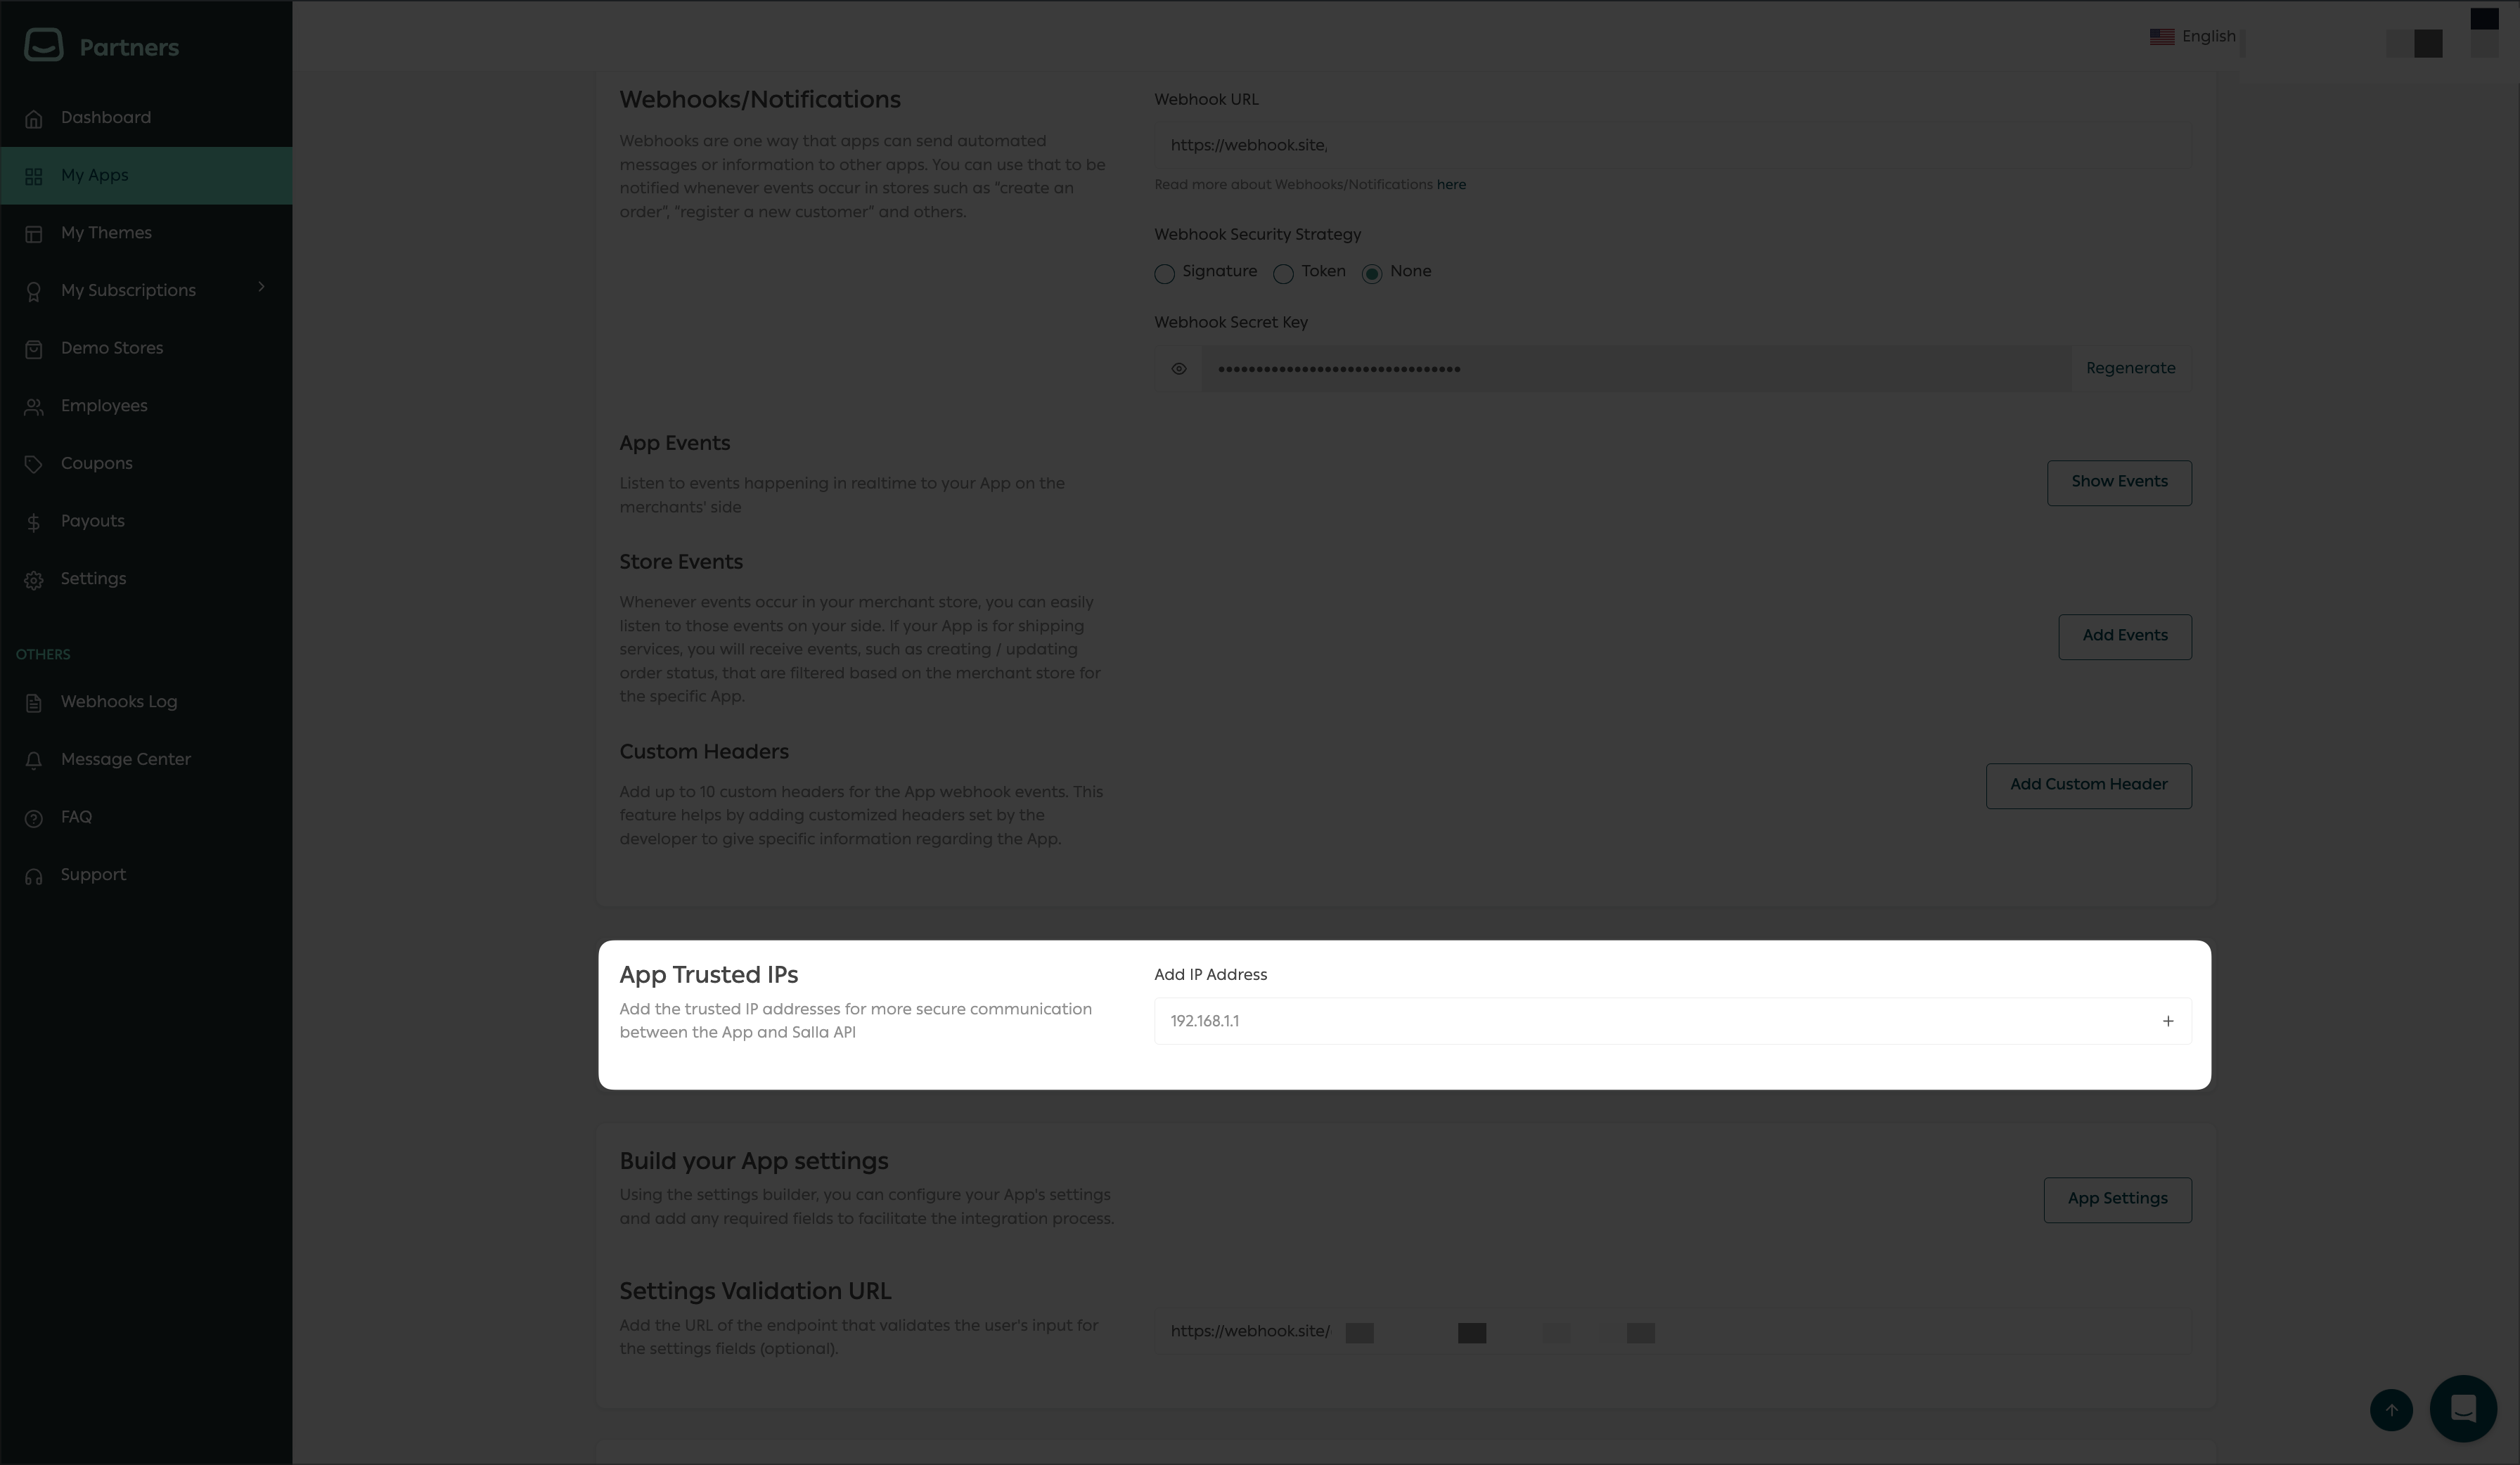
IP whitelisting is a security feature that restricts access to an App to only the IP addresses that are included on the whitelist. This can be used to restrict unwanted access and protect critical data from potential compromise.It works by denying all IP addresses, except for those specifically listed as "whitelisted," thereby limiting the access to only approved users. This way, developers can better protect their private data from potential outside threats, such as hackers and malware, by reducing the attack surface area.IP Whitelisting can also be used for other purposes such as controlling bandwidth usage or limiting access to certain services. You may reach the App setup page by going to the Partners Dashboard and selecting the "My Apps" tab:From this page, you can add the permitted IP addresses in the following area, which is labeled "App Trusted IPs":
NOTE
Get additional information about App Trusted IPs by visiting this article.
Salla developed various clients and OAuth-specific libraries, such as:
PHP Client | OAuth2 Merchant
JavaScript Client | Passport Strategy
Laravel Starter Kit | OAuth Controller
These open-source libraries, powered by Salla, are here to assist in bootstrapping your development journey with Salla by providing code snippets easily accessible, readable, and maintainable by Salla’s own experts as well as the Global Community of developers.