


Command Line Interface (CLI)
salla app functions build, deploy, and serve.Important
Prerequisites
Step 1: Install the Salla CLI
Install the CLI globally
This puts the
salla binary on your PATH.Log in to your Partner account
deploy and serve need a valid session. build runs fully offline.Verify the installation
Full installation details, including Rosetta for Apple silicon and PowerShell execution policies, are in the Salla CLI Usage guide.
Step 2: Create Your Project
Scaffold from the template
Use GitHub's Use this template button, or clone it directly:
Install dependencies
src/
  index.ts                # the events map — your default export
  functions/              # one file per handler
    order-created.ts
    customer-login.ts
test/
  index.spec.ts           # example tests for the handlers
dist/
  index.js                # build output (generated; this is what gets deployed)
.env.example              # template for CLI config — copy to .env
Step 3: Register Your Event Handlers
src/index.ts must default-export an events map that binds Salla event names to handlers. The CLI refuses to build without it.import type { DefineEvents } from "@salla.sa/app-functions-types";
import { orderCreated } from "./functions/order-created";
import { customerLogin } from "./functions/customer-login";
// The types package ships no runtime code, so provide the identity
// implementation and borrow its `DefineEvents` signature for key validation.
const defineEvents: DefineEvents = (events) => events;
const events = defineEvents({
"order.created": orderCreated,
"customer.login": customerLogin,
});
export default events;context and returns a FunctionResponse. Handlers may be async and return Promise<FunctionResponse>:import type { FunctionResponse, Order } from "@salla.sa/app-functions-types";
export const orderCreated = (context: Order): FunctionResponse => {
const order = context.payload.data;
console.log(`New order #${order.id} received!`);
return {
success: true,
status: 200,
message: `Order ${order.reference_id} received`,
data: { orderId: order.id },
};
};1.
src/functions/<your-handler>.ts exporting a handler function2.
src/index.ts3.
'<salla.event>': yourHandler entry to the mapEvent names are exact string literals in
dot.case — order.created, not "Order Created". Browse them all in Supported Events. You can also define your own — see Working with Custom Events.Step 4: Point the CLI at Your App
| Priority | Source | Example |
|---|---|---|
| 1 | The [app_id] argument or --app-id option | salla app functions deploy 1234567890 |
| 2 | SALLA_APP_ID in your project's .env | see below |
| 3 | The App ID remembered from your last run | stored in ~/.salla/config.json |
| 4 | Interactive picker | deploy and serve ask you to choose |
.env is the recommended setup for a project you deploy repeatedly — every command then just works with no arguments:deploy and 👁️ serve show an interactive picker, listing your Salla Partners Apps by name and IDbuild doesn't need an App ID — it only uses it to print a ready-to-copy deploy command, falling back to an <app_id> placeholder? Select the app you want to deploy to
❯ My Awesome App [1234567890] (public)
Shipping Companion [9876543210] (shipping)Every resolved App ID — typed explicitly or picked from the list — is remembered as the default for your next
build, deploy, or serve. To work against a different App, pass its ID explicitly; an explicit App ID always overrides the remembered one. If you pass both a positional argument and --app-id, the option wins.Step 5: Build Your Functions
build command bundles src/index.ts — together with everything it imports — into a single ESM file at dist/index.js, ready to be deployed.
✔ Hooray! Built /your-project/dist/index.js successfully.
ℹ You can now deploy your app using: salla app functions deploy 1234567890format: esm, target: es2022), so TypeScript is compiled and all local imports are inlined into one filesrc/index.ts, the build fails with a clear error<app_id> placeholder is shown insteadStep 6: Deploy to Salla
deploy command builds your bundle and ships it to Salla's infrastructure.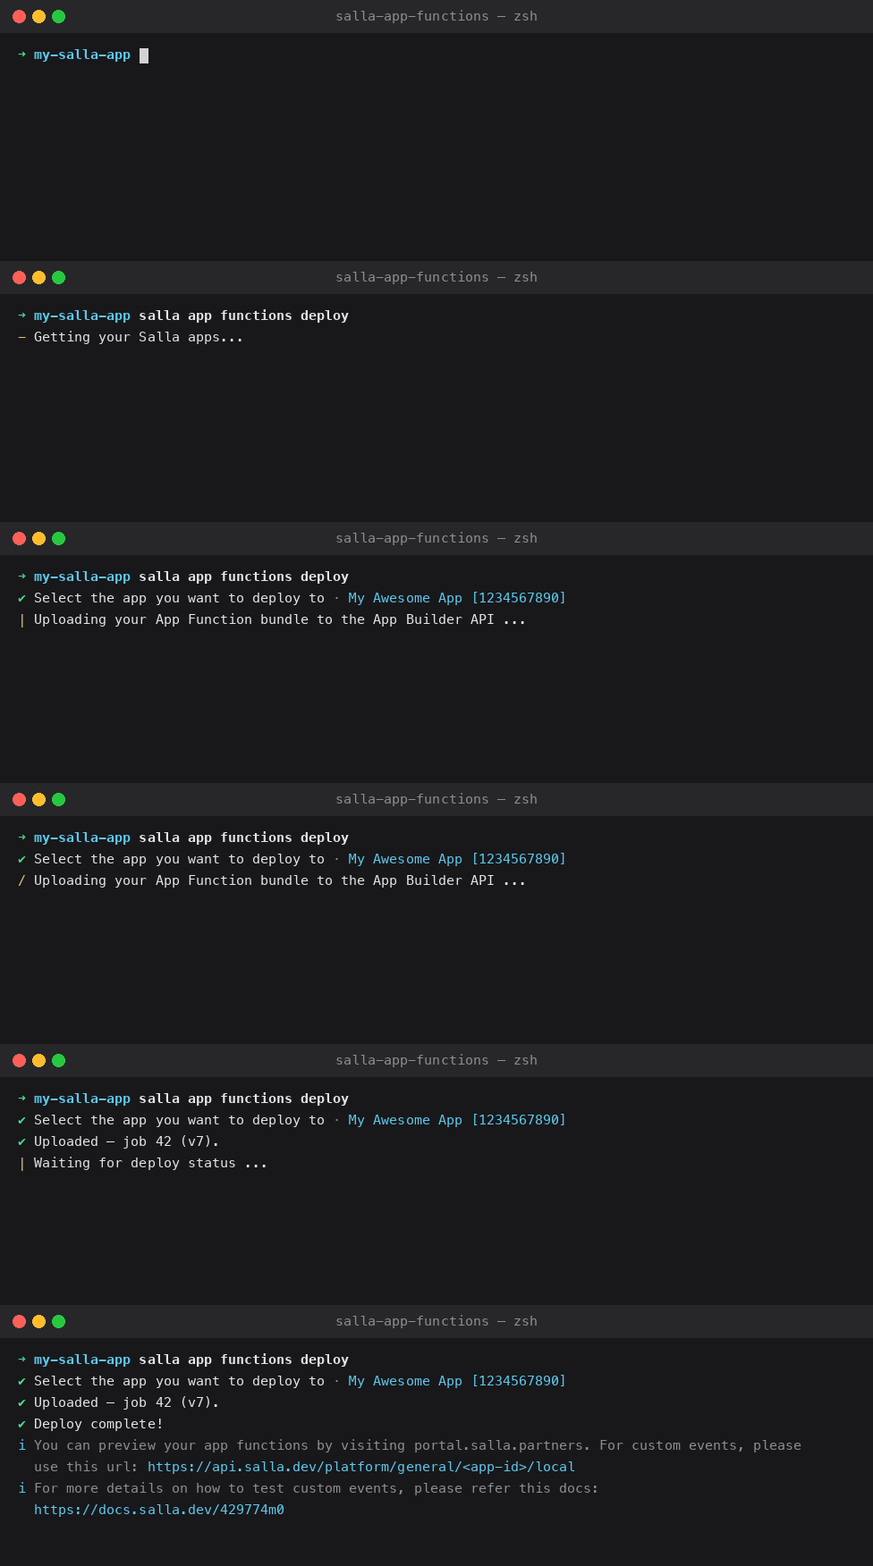
Build
The bundle is rebuilt from
src/index.ts, identical to running build. Pass --skip-build to deploy the existing dist/index.js as-is; if that file doesn't exist, the command stops and asks you to run salla app functions build first.Upload
The bundle is uploaded to the App Builder API, and the CLI prints the deployment job ID and the new version.
✔ Uploaded — job 42 (v7).Deploy status
The CLI connects to Salla's deploy-status websocket and waits up to 5 minutes for your job's result.If the deploy fails, the failure reason is printed. If no status arrives within 5 minutes, the CLI times out and asks you to check the job status on the App Builder dashboard.
✔ Deploy complete!
✔ Preview: https://portal.salla.partners/apps/1234567890/functions
ℹ You can preview your changes using the preview URL above, and watch live logs using: salla app functions serveStep 7: Watch Live Logs
serve command connects to your app's log channel and streams every console.log / console.error your deployed functions emit, as they handle live events.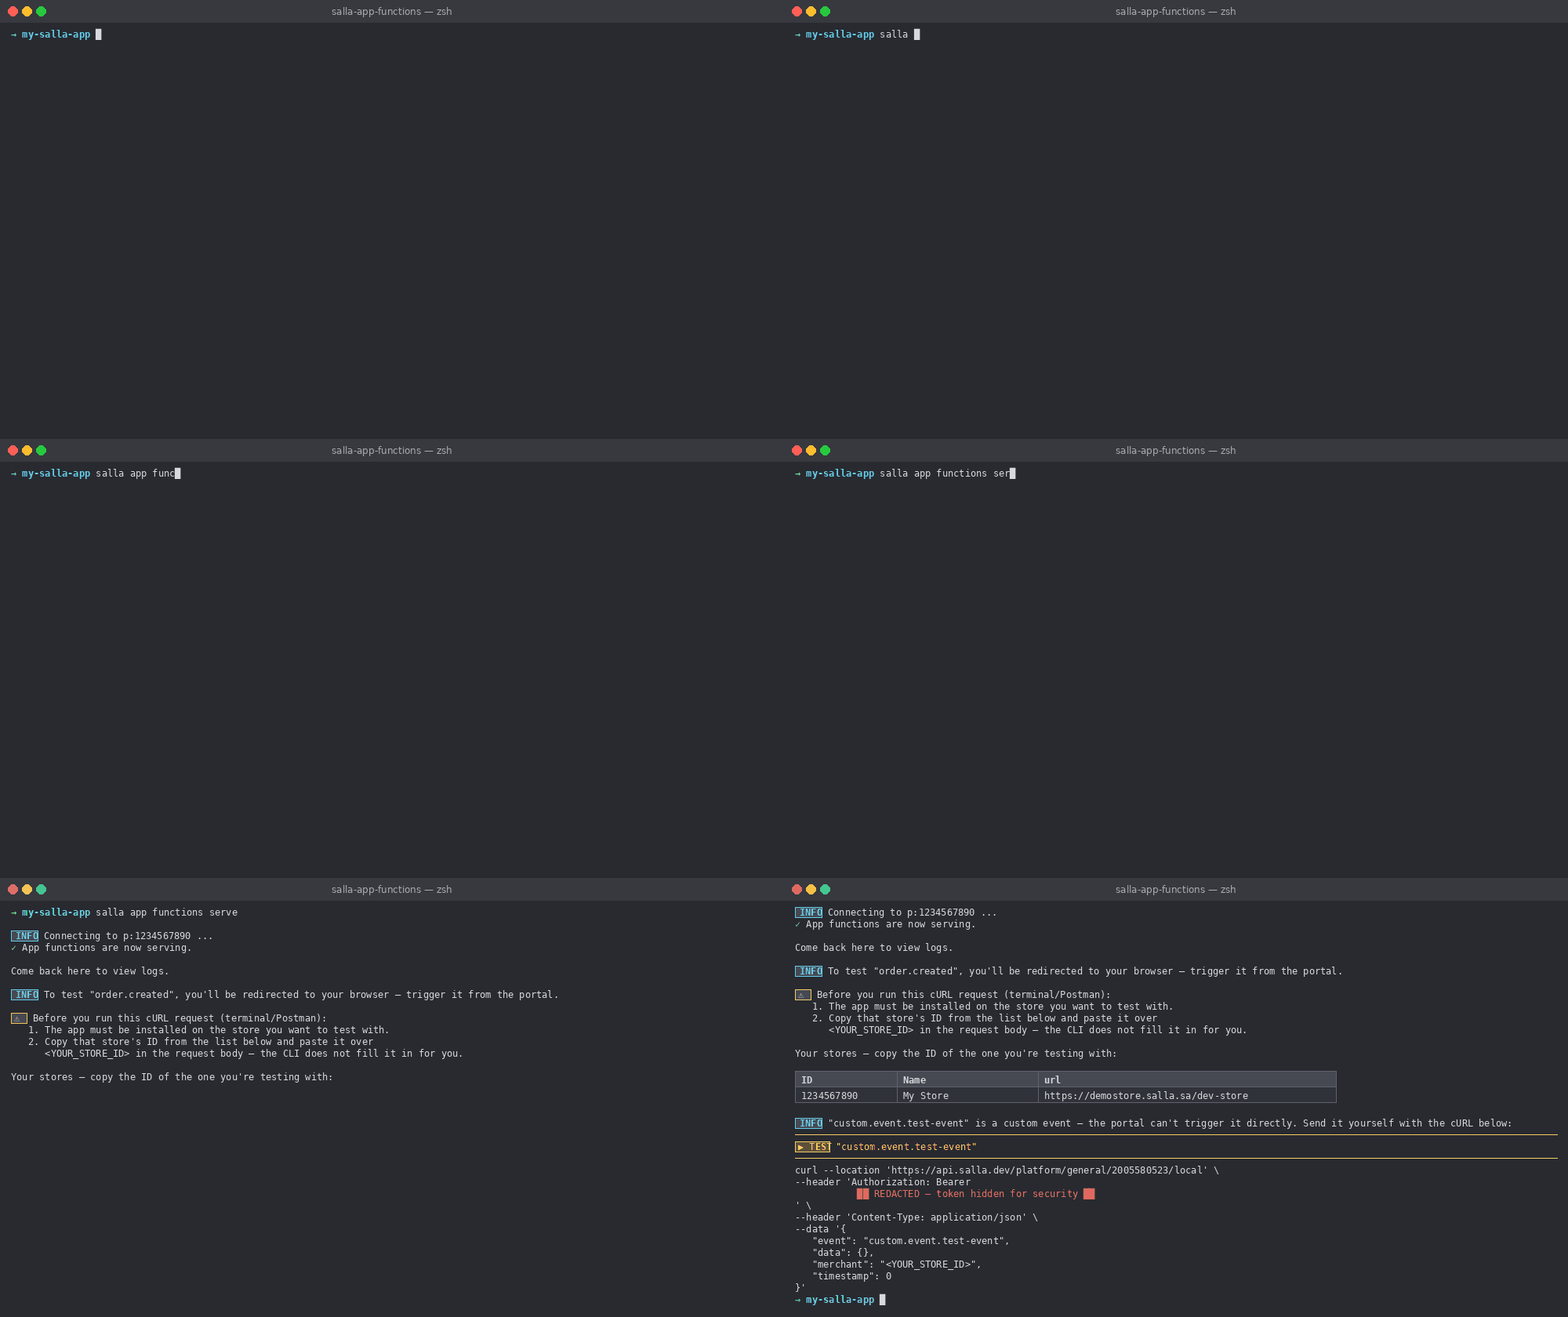
serve reads the events map from your project and sets up a way to trigger each kind of event it finds:It connects to your log channel
ℹ Connecting to p:416209744 ...
✅ App functions are now serving.

Come back here to view logs.For Salla events, it opens the portal in your browser
The portal can fire these for you — place a test order, update a product, sign in as a customer — and the log lines land in your terminal as they happen.If the browser can't be opened, the CLI prints the link for you to open manually.
ℹ To test "order.created", you'll be redirected to your browser — trigger it from the portal (e.g. place a test order for order.created).For custom events, it prints a ready-to-run cURL
The portal can't trigger See Triggering Events for Testing for the full block and what to edit before running it.
custom.event.* handlers, so the CLI builds the request for you and prints one block per custom event in your map. Copy it, paste it into your terminal or Postman, and the event shows up in the same serve session.2026-07-23 14:05:12 | INFO | New order #560915 received!
2026-07-23 14:05:12 | ERROR | Failed to notify the shipping providertimestamp | LEVEL | message, with the level color-coded (TRACE, DEBUG, LOG, INFO, WARN, ERROR)--raw to print the full message envelopes exactly as the server sends them — including deploy-status and connection messages that are normally hiddenFor unit tests, the preview panel, and testing strategies in general, see Testing App Functions.
Working with Custom Events
custom.event. and registered in the same map:const events = defineEvents({
"custom.event.nightly-inventory-sync": nightlyInventorySync,
});npm run typecheck rather than at deploy:| Rule | ✅ | ❌ |
|---|---|---|
Lowercase a–z, 0–9, - and . only | custom.event.order-sync | custom.event.orderSync |
| No leading or trailing hyphen | custom.event.sync-v2 | custom.event.-sync |
| No consecutive hyphens | custom.event.sync-v2 | custom.event.sync--v2 |
| Max 60 characters | — | a 61-character suffix |
Triggering a Custom Event
POSTrequest to your App's trigger URL:https://api.salla.dev/platform/general/<app_id>/localsalla app functions serve and the CLI prints it for every custom event in your map, token included:Before you run it
1.
2.
<YOUR_STORE_ID> with that store's ID — the CLI does not fill this one in for you. It lists your stores right below the cURL block; you can also run salla store list.3.
data with your own payload — see below.Passing Your Own Data
"data": {} as a placeholder, but that object is yours to define. Unlike Salla's events — where the payload shape is fixed by the platform — a custom event carries whatever you put in it, and the platform passes it through untouched:context.payload.data:import type { FunctionResponse, SallaCustomEvent } from "@salla.sa/app-functions-types";
export const nightlyInventorySync = (context: SallaCustomEvent): FunctionResponse => {
const { sku, quantity, source } = context.payload.data;
console.log(`Syncing ${quantity} × ${sku} from ${source}`);
return {
success: true,
status: 200,
message: "Inventory synced",
data: { sku, quantity },
};
};Accessing the Custom Event Authorization
custom.event.* handlers are public — anyone who knows your event URL can trigger them without providing any credentials.X-App-Function-Authorization header on the request:X-App-Function-Authorization: Bearer <your-token-is-filled-in-here>context.authorization.If the header is present,
context.authorization contains the original token together with the parsed scheme:{
token: "Bearer <token>",
scheme: "Bearer"
}context.authorization is set like this:{
token: null,
scheme: null
}context.authorization directly instead of parsing the request header themselves — check whether token is null to know whether the incoming request was authenticated.export default async function (context) {
if (!context.authorization.token) {
return { status: 401, body: "Unauthorized" };
}
const response = await fetch("https://api.example.com/inventory/status", {
method: "GET",
headers: {
"Authorization": context.authorization.token,
"Content-Type": "application/json",
},
});
const data = await response.json();
// ...continue processing the event with `data`
return { success: true, status: 200, body: data };
}context.authorization.token already includes the scheme prefix (e.g. Bearer <token>) if the X-App-Function-Authorization header is present, so it can be passed straight into the outgoing Authorization header without any extra formatting.Prefer a visual client? The Postman tab in Triggering Events for Testing shows how to import the same request.
Triggering Events for Testing
serve running, pick the trigger that matches the event you want to exercise. Whichever you use, the resulting log lines land in your open serve session in real time.Partner Portal
cURL
Postman
Best for Salla's own events —
The portal cannot trigger
order.created, customer.login, product.updated, and the rest.serve opens the portal on your App's functions page for you. From there, perform the real action against your demo store — place a test order, update a product, sign in as a customer — and watch the corresponding log lines appear in your terminal as they happen.ℹ To test "order.created", you'll be redirected to your browser — trigger it from the portal (e.g. place a test order for order.created).Important
custom.event.* handlers. Use the cURL or Postman tab for those.Command Reference
| Command | Description | App ID |
|---|---|---|
salla app functions build [app_id] | Bundles src/index.ts into dist/index.js | Optional — only used in the printed hint |
salla app functions deploy [app_id] | Builds and deploys your bundle to Salla | Optional — prompts if omitted |
salla app functions serve [app_id] | Streams live logs and prints event triggers | Optional — prompts if omitted |
| Option | Applies to | Description |
|---|---|---|
[app_id] / --app-id <app_id> | all | Target App ID (overrides SALLA_APP_ID from .env) |
--skip-build | deploy | Deploy the existing dist/index.js without rebuilding |
--raw | serve | Print full message envelopes instead of formatted log lines |
The command surface may evolve — run
salla app functions --help for the current list.Troubleshooting
| Symptom | Likely cause |
|---|---|
No src/index.ts found | Running the CLI outside the project root, or the events map isn't the default export |
Argument of type '{ … }' is not assignable to parameter of type 'never' | An event key isn't recognised — keys are lowercase dot.case triggers (product.viewed, not "Product Viewed") |
No dist/index.js found | You used --skip-build before ever building — run salla app functions build |
No apps found for your partner account | Create an App in the Partner Portal first |
| Deploy times out after 5 minutes | No status arrived on the websocket — check the job on the App Builder dashboard |
serve prints no cURL block | No custom.event.* key was found in your events map — check src/index.ts |
serve shows no logs | No events fired yet, or the App ID doesn't match the App you deployed to |
| Custom event returns but nothing runs | <YOUR_STORE_ID> wasn't replaced, or the app isn't installed on that store |
Next Steps
Need Help?
Modified at 2026-09-06 15:24:11