Development Preparation gave you the mental model, OAuth, webhooks, APIs, embedded pages. This article is where you actually build: creating the app entry itself, wiring up webhooks reliably, rendering UI inside the merchant dashboard, moving background work into App Functions, handling merchant data responsibly, and testing before you touch Publishing Your App.Read this article in order the first time. After that, treat each section as a standalone reference you return to whenever you add a new webhook, a new embedded page, or a new data flow.
Creating your app is the step that turns an idea into something with real credentials: an entry in the Partners Portal with a name, a category, a redirect URL, and a client ID/secret pair Salla issues specifically to you.
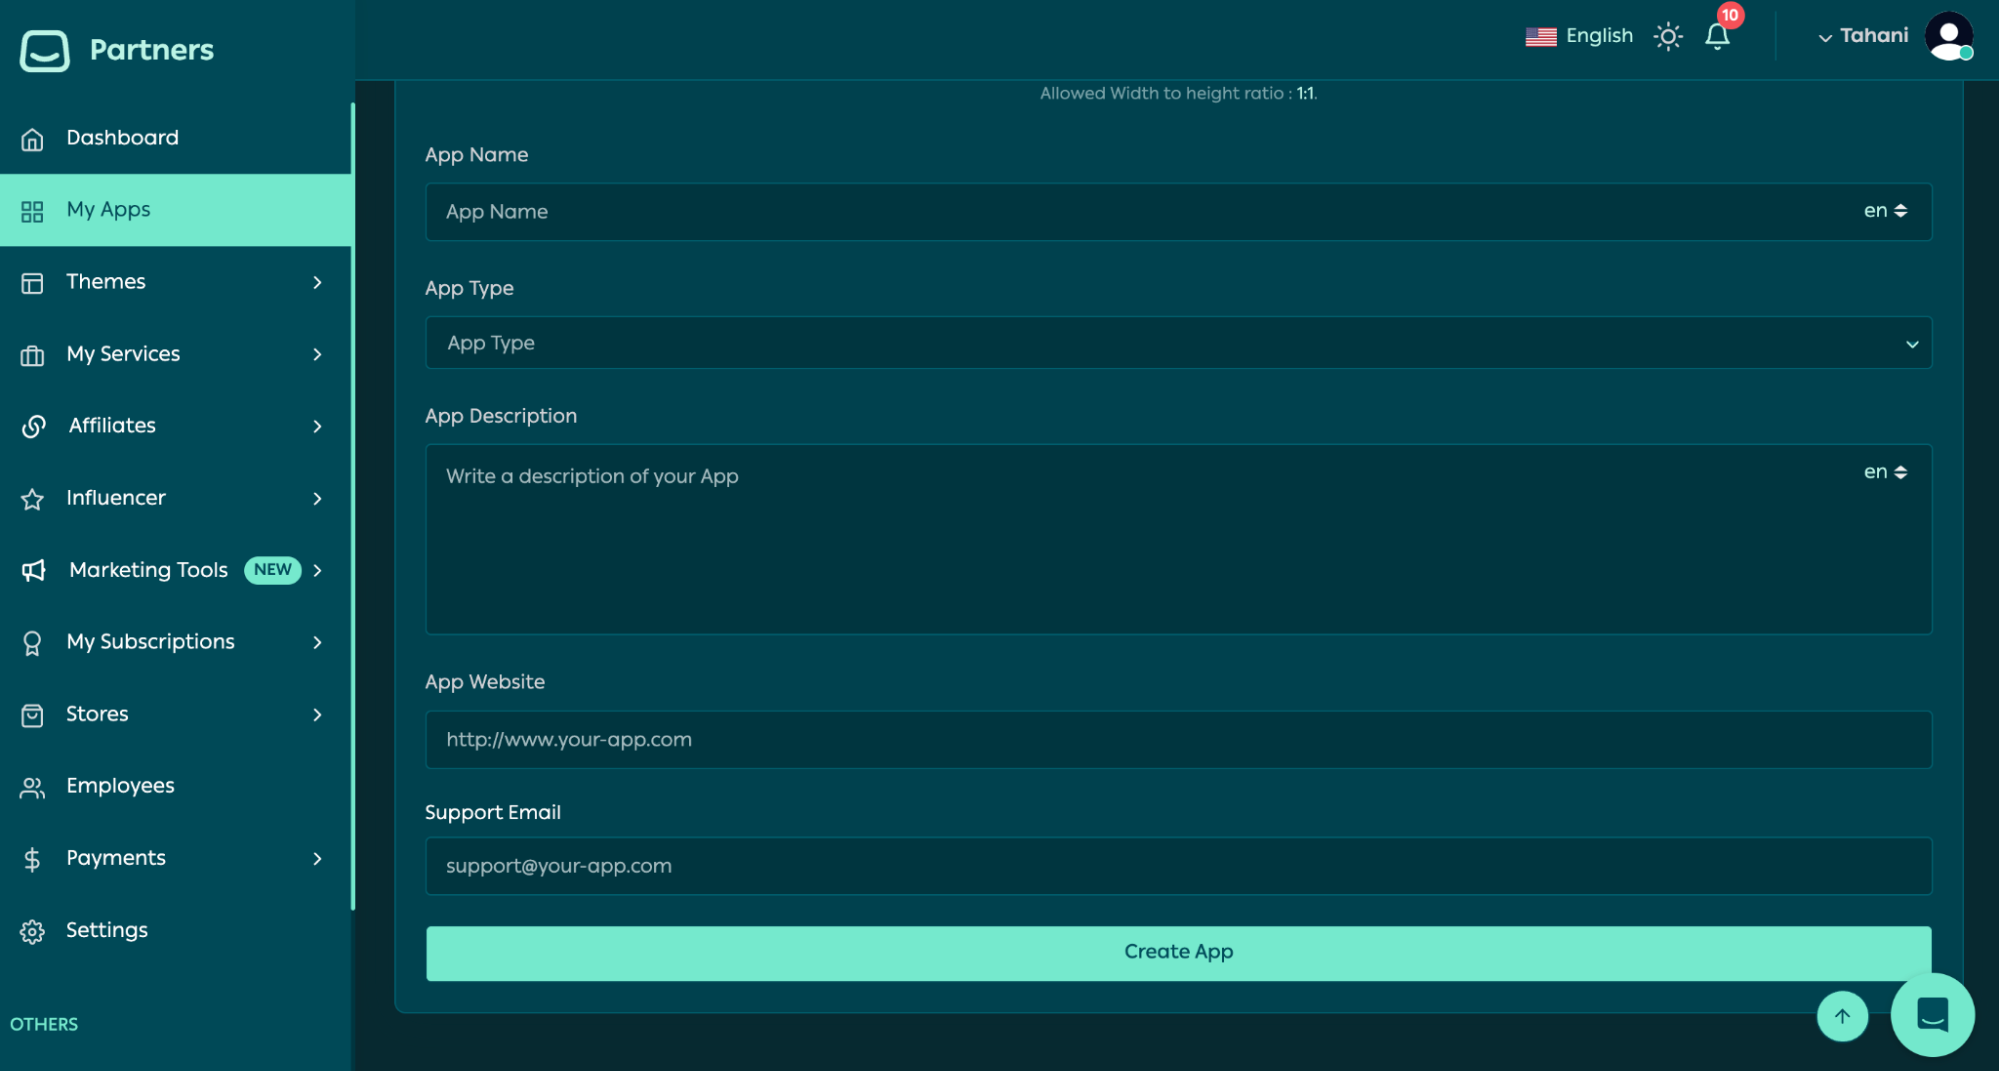
In the Partners Portal, choose "Create App" and select Public or Private (Introduction to Salla Partners, By Distribution Model).
2
Name it and pick a category
Name your app and assign it to one App Store category (Introduction to Salla Partners, By Category). You can change this later, but a category swap after review can trigger re-review.
3
Set your redirect/callback URL
The endpoint on your server that receives the OAuth authorization code. During development this points at your local tunnel URL (Development Preparation); update it to your production URL before submission.
4
Select your OAuth scopes
Request the minimum required, this is checked in review (Publishing Your App) and it is the first thing merchants see on the authorization screen (Figure 4.9).
5
Save the app entry
Salla issues a client ID and client secret, store these in your .env file immediately, never in source control.
6
Install on your demo store
Install the app on your own demo store to confirm the OAuth flow completes end to end before writing any other feature code.
Figure 5.1 - Creating a new app entry in the Partners Portal
Best Practices
Create the app entry and complete a full install-to-demo-store cycle before building any feature, it confirms your foundation works.
Treat your requested scope list as a living document; remove scopes you stop using.
Common Mistakes
Requesting broad scopes upfront "in case you need them later", this slows merchant trust and review.
Leaving the redirect URL pointed at a temporary tunnel address when submitting for review.
Webhooks are how Salla notifies your app, in near real time, that something happened in a merchant's store, a new order, a product update, an uninstall. Your app exposes an endpoint; Salla calls it with an event payload whenever a subscribed event occurs.
Webhooks are how most Salla apps stay in sync with a store without constantly polling the API (a mistake flagged in Development Preparation). They are also the only reliable way to learn about events you did not trigger yourself, a merchant editing a product directly in their dashboard, for instance.
Subscribe to a webhook for any event your app needs to react to as it happens: order.created for a fulfillment app, product.updated for a catalog-sync app, app.uninstalled for every app, without exception (Development Preparation, App Lifecycle).
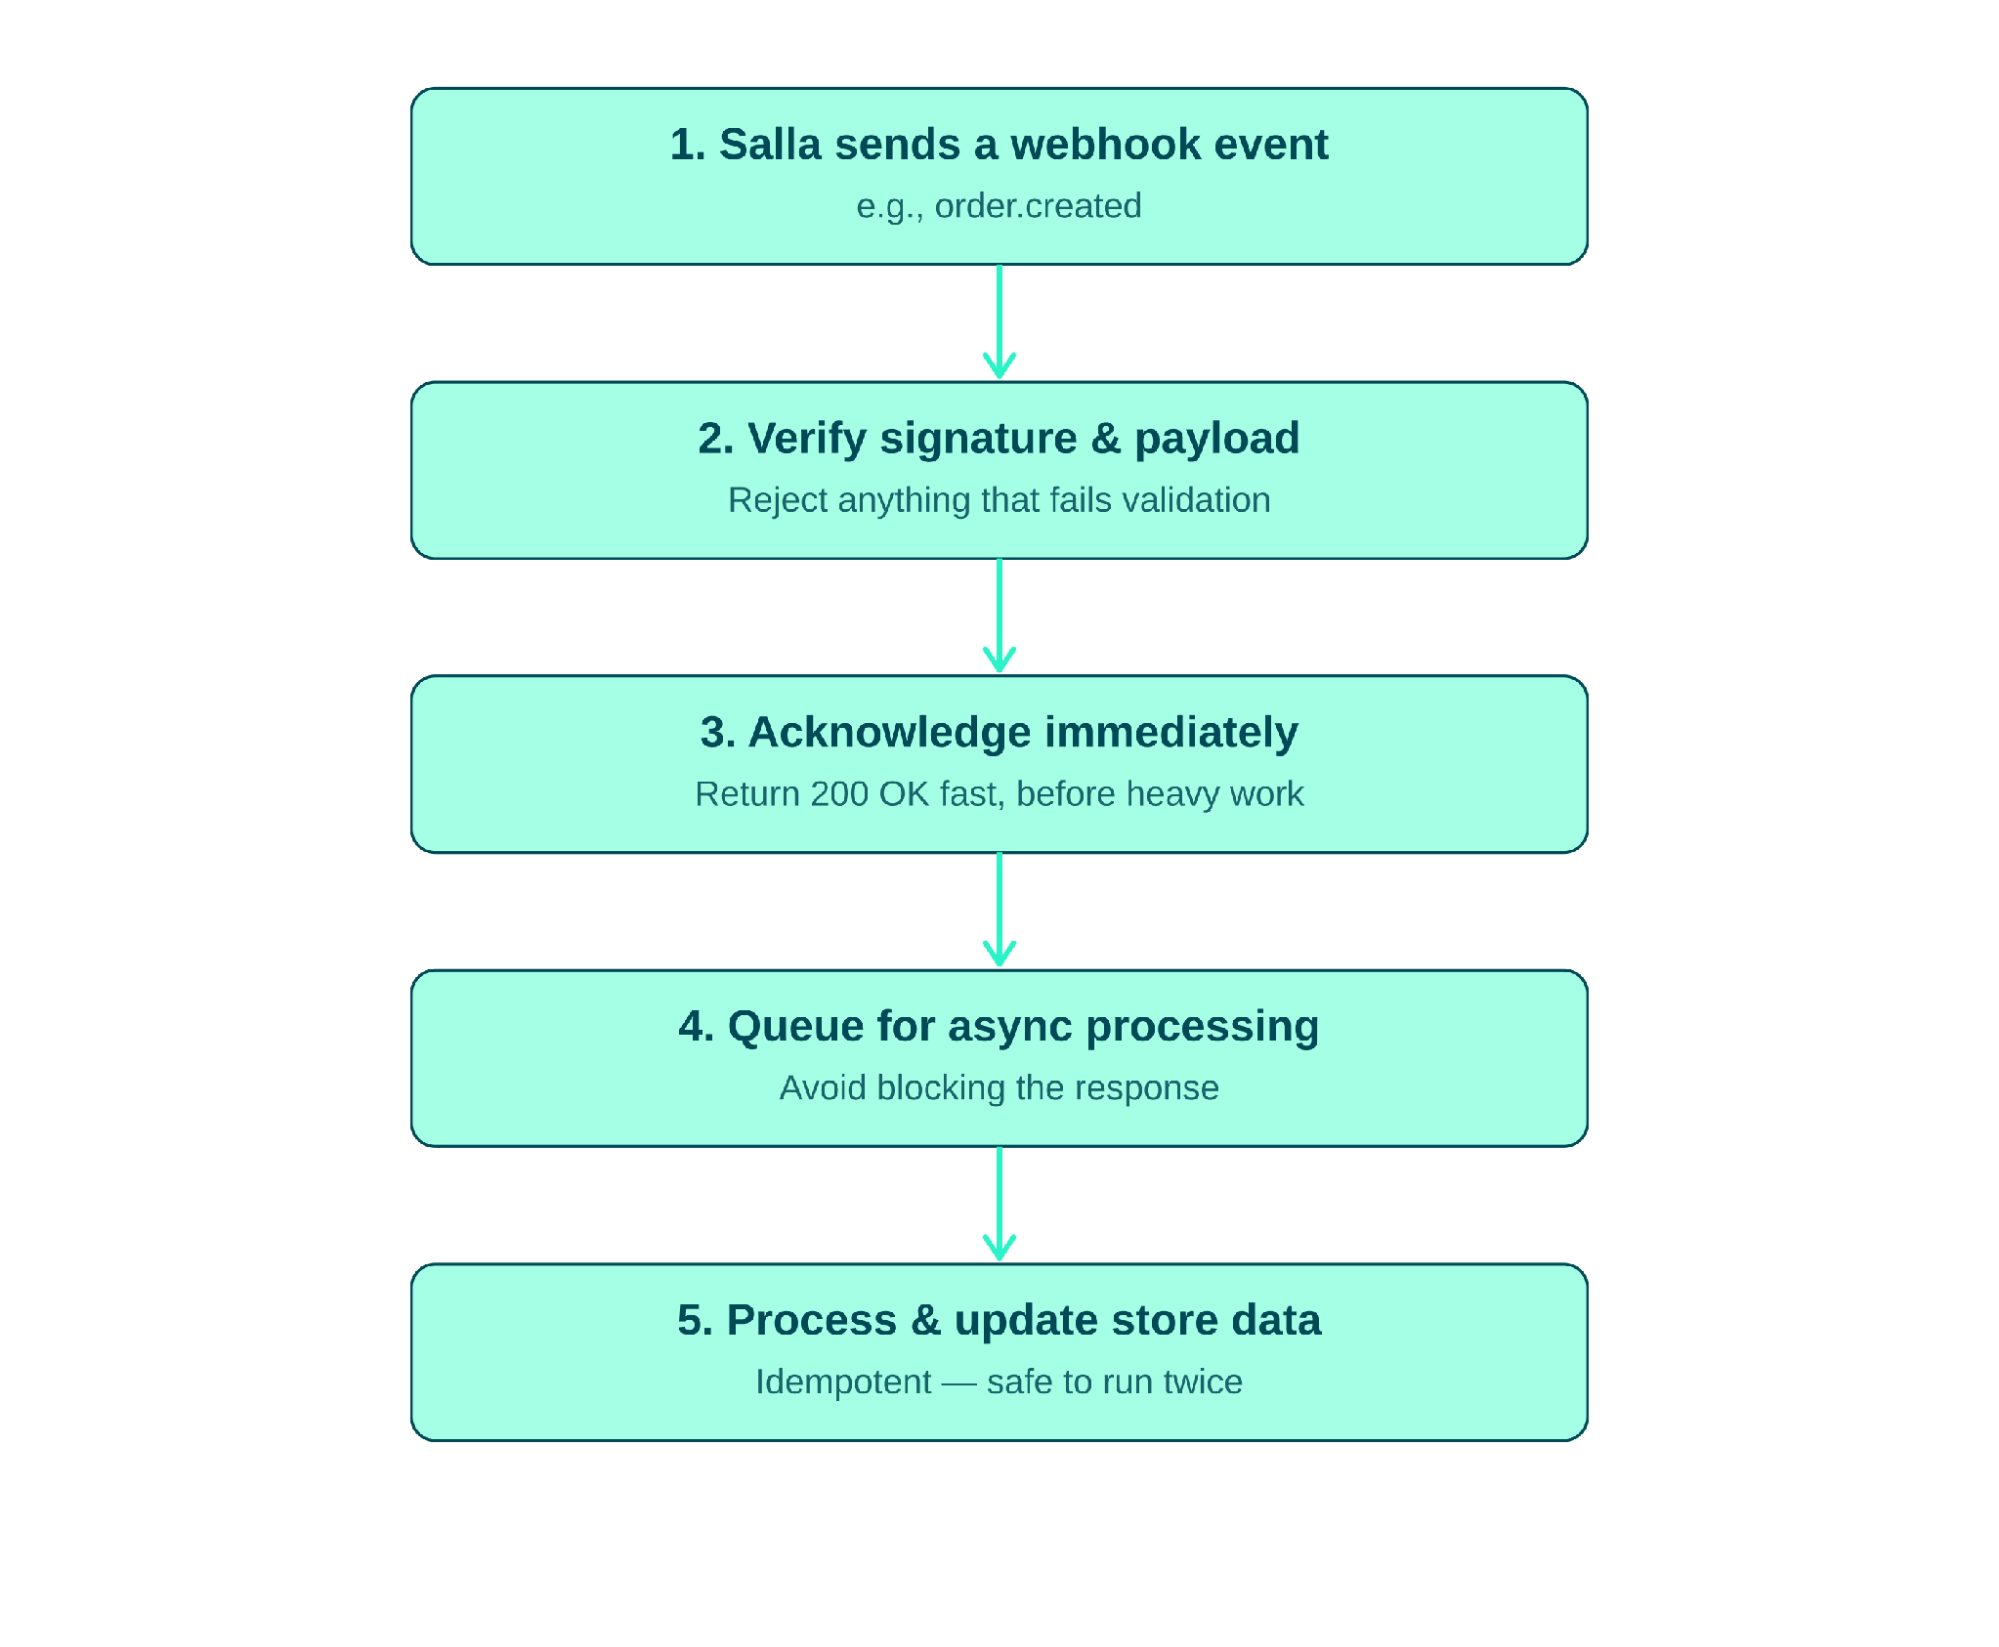
Handle every incoming webhook with the same five steps, in order:
1
Verify
Check the request signature against your webhook secret before doing anything else. An unverified payload could come from anyone, not Salla.
2
Acknowledge
Respond quickly (a 2xx status) once you have verified the payload. Salla retries webhooks that do not get a timely response, so slow processing causes duplicate deliveries.
3
Queue
Hand the verified payload to a background job or queue rather than processing it inline. This keeps your acknowledgment fast and isolates failures.
4
Process
Do the actual work (update your database, call back into the Salla API, trigger an AI feature) inside the queued job, not the webhook handler itself.
5
Process idempotently
Design the handler so receiving the same event twice (which will happen) produces the same end state, not duplicated side effects. Track processed event IDs and skip repeats.
Figure 5.2 - A webhook event arriving, being verified, and queued for processing
Best Practices
Always verify the signature before trusting a webhook payload, even in early development.
Store the ID of every processed event so retried deliveries can be safely skipped.
Common Mistakes
Doing slow, synchronous work inside the webhook handler itself, causing Salla to retry and your app to double-process events.
Subscribing to every available event "just in case" instead of only the ones your app acts on.
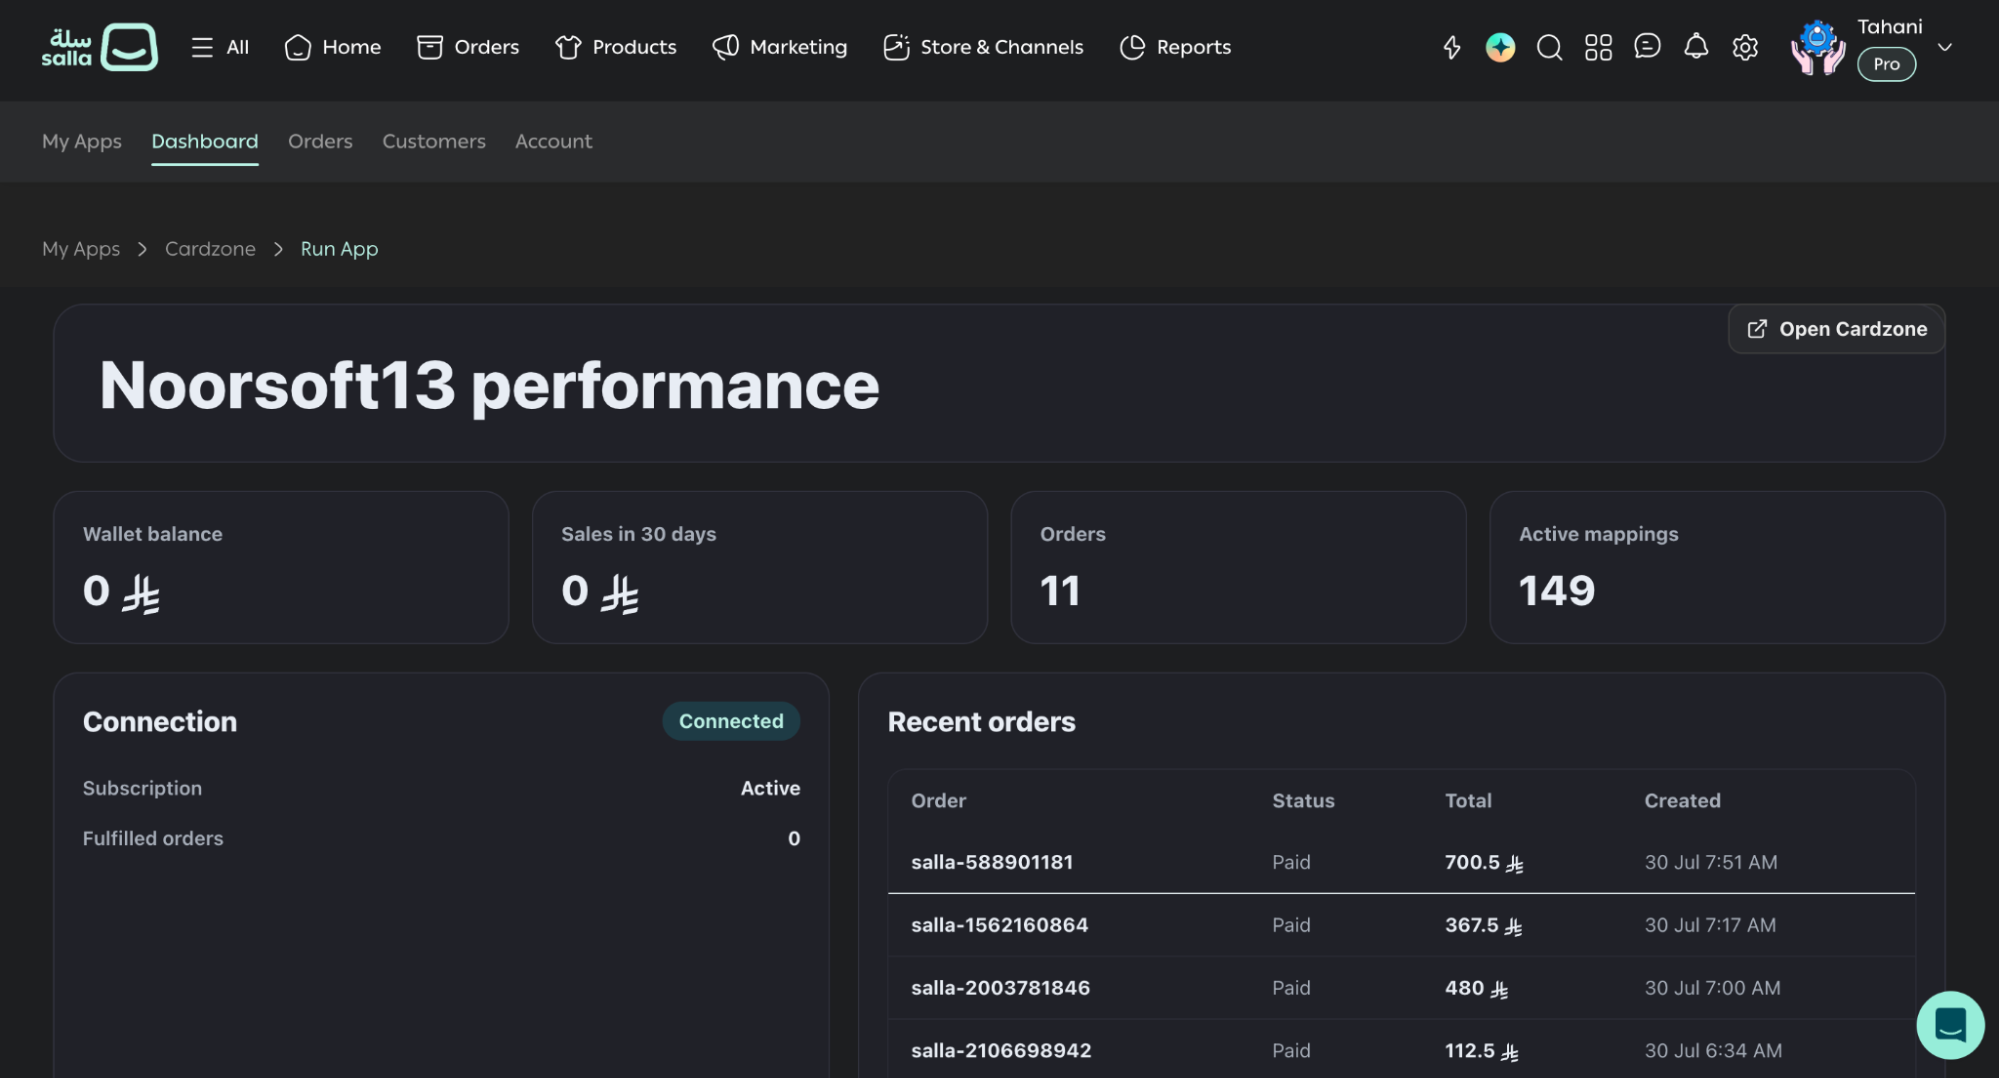
Embedded pages are UI your app renders inside the Salla merchant dashboard, so a merchant never has to leave Salla to use your app. Onboarding is the first sequence of screens a merchant sees right after install, before they reach your app's core feature.
A merchant's first few minutes after install disproportionately shape whether they ever come back (Growing Your App, Support & Success references this same 48-hour activation window). An embedded page that feels bolted-on, or an onboarding flow with unnecessary friction, costs you activated merchants before they have seen any real value.
Use embedded pages for any UI a merchant needs regularly, settings, dashboards, generated content review. Use a dedicated onboarding sequence whenever your app needs setup beyond a single OAuth approval, connecting a third-party account, choosing a plan, or configuring a first automation.
Design onboarding as the shortest path to the merchant's first real result, not a tour of every feature. If your app's outcome is "generate a product description," get the merchant to one generated description before showing anything else.
Match Salla's own dashboard conventions for navigation and spacing (Development Preparation, UX Guidelines) so your embedded page does not feel like a foreign window.
Use sensible defaults so a merchant can proceed without configuring anything unnecessary, asking for the minimum input needed to produce a first result.
Track completion of onboarding as its own event, separate from install (Growing Your App, Analytics & KPIs) so you can see where merchants drop off.
Figure 5.3 - An app dashboard embedded directly in the merchant's Salla admin
Best Practices
Design onboarding around the merchant's first real result, not a feature tour.
Instrument onboarding step-by-step so you can see exactly where merchants stop.
Common Mistakes
Asking for every possible setting up front instead of using sensible defaults and letting merchants adjust later.
Building an embedded page that visually clashes with Salla's own dashboard, making the app feel unofficial.
App Functions are Salla's serverless, event-triggered execution environment, a way to run a small piece of logic in response to a store event without standing up and maintaining your own always-on server for it.
Not every action your app takes needs a persistent backend. A single, well-scoped action, send an SMS when an order ships, notify a merchant when stock drops below a threshold, is a natural fit for a function that runs on demand and costs nothing when idle.
Reach for an App Function when the logic is triggered by a single event, is stateless or reads/writes a small amount of external data, and does not need to stay running between events. If the logic needs to hold open connections, run scheduled jobs across many merchants, or coordinate multi-step workflows (AI for Commerce, AI Agents & MCP), keep it on your main server instead.
Identify one webhook-triggered action worth extracting, e.g., "on order.shipped, send an SMS via a third-party provider."
2
Write the function
Write the function to do exactly that one thing: receive the event payload, call the third-party API, and exit.
3
Deploy it
Deploy it through the Partners Portal's App Functions tooling, associated with your app entry.
4
Subscribe it to the event
Subscribe the function to the relevant webhook event instead of routing that event to your main server.
Functions vs. Your Server
App Functions and your main server both receive events the same way conceptually - the difference is deployment and lifecycle, not the event model itself. Move an action into a Function when it is simple and self-contained; keep it on your server when it needs shared state or coordination with other logic.
Best Practices
Keep each App Function scoped to one action tied to one event, resist bundling unrelated logic into it.
Log function invocations and failures the same way you would webhook handlers on your main server.
Common Mistakes
Using an App Function for logic that needs persistent state or coordination across multiple events.
Duplicating the same logic in both a Function and your main server, creating two places to maintain it.
Data management is how your app decides what merchant and customer data to store, for how long, and how to remove it, covering everything from access tokens to AI conversation history to analytics events.
Every piece of data your app stores is a piece of data you are responsible for securing, and a piece of data you must account for when a merchant uninstalls (Development Preparation, App Lifecycle) or asks what you hold about them. Under-collecting is almost always safer than over-collecting "just in case."
Apply these principles continuously, not just before submission, every new feature that touches merchant or customer data (a new webhook subscription, a new AI feature, a new analytics event) should be checked against your retention policy before it ships.
Data minimization: only store what a feature actively uses. AI for Commerce's Conversation Memory guidance (re-fetch fresh data rather than caching it) is a direct application of this principle.
Scoped retention: define, per data type, how long you keep it (access tokens until uninstall, generated content indefinitely unless deleted, raw AI prompts for a short debugging window only).
Uninstall cleanup: when the app.uninstalled webhook arrives, revoke the stored access token and delete or anonymize merchant-specific data per your stated policy (Development Preparation).
Third-party disclosure: document every third-party service merchant or customer data flows to (AI providers, SMS/email providers), this is requested directly during review (Publishing Your App) and belongs in your privacy documentation.
OAuth access/refresh tokens
Until uninstall, then revoked and deleted.
Generated content (descriptions, replies)
Kept until deleted or uninstalled.
Raw AI prompts/responses (for debugging)
Short window (e.g., 30 days), then purged.
Analytics/usage events
Aggregated indefinitely; avoid raw PII.
Best Practices
Write down your retention policy per data type before you build the feature that generates that data.
Treat the app.uninstalled webhook as a data-deletion trigger, not just an access-revocation trigger.
Common Mistakes
Storing customer PII inside generic analytics events without a clear reason.
Discovering during review that you never documented which third-party providers receive merchant data.
Testing, a procedure to follow before every release#
Test the full install flow on a fresh demo store, including the OAuth authorization screen.
Test your core feature with realistic data, empty carts, out-of-stock products, cancelled orders, not just the "happy path" of a perfect order.
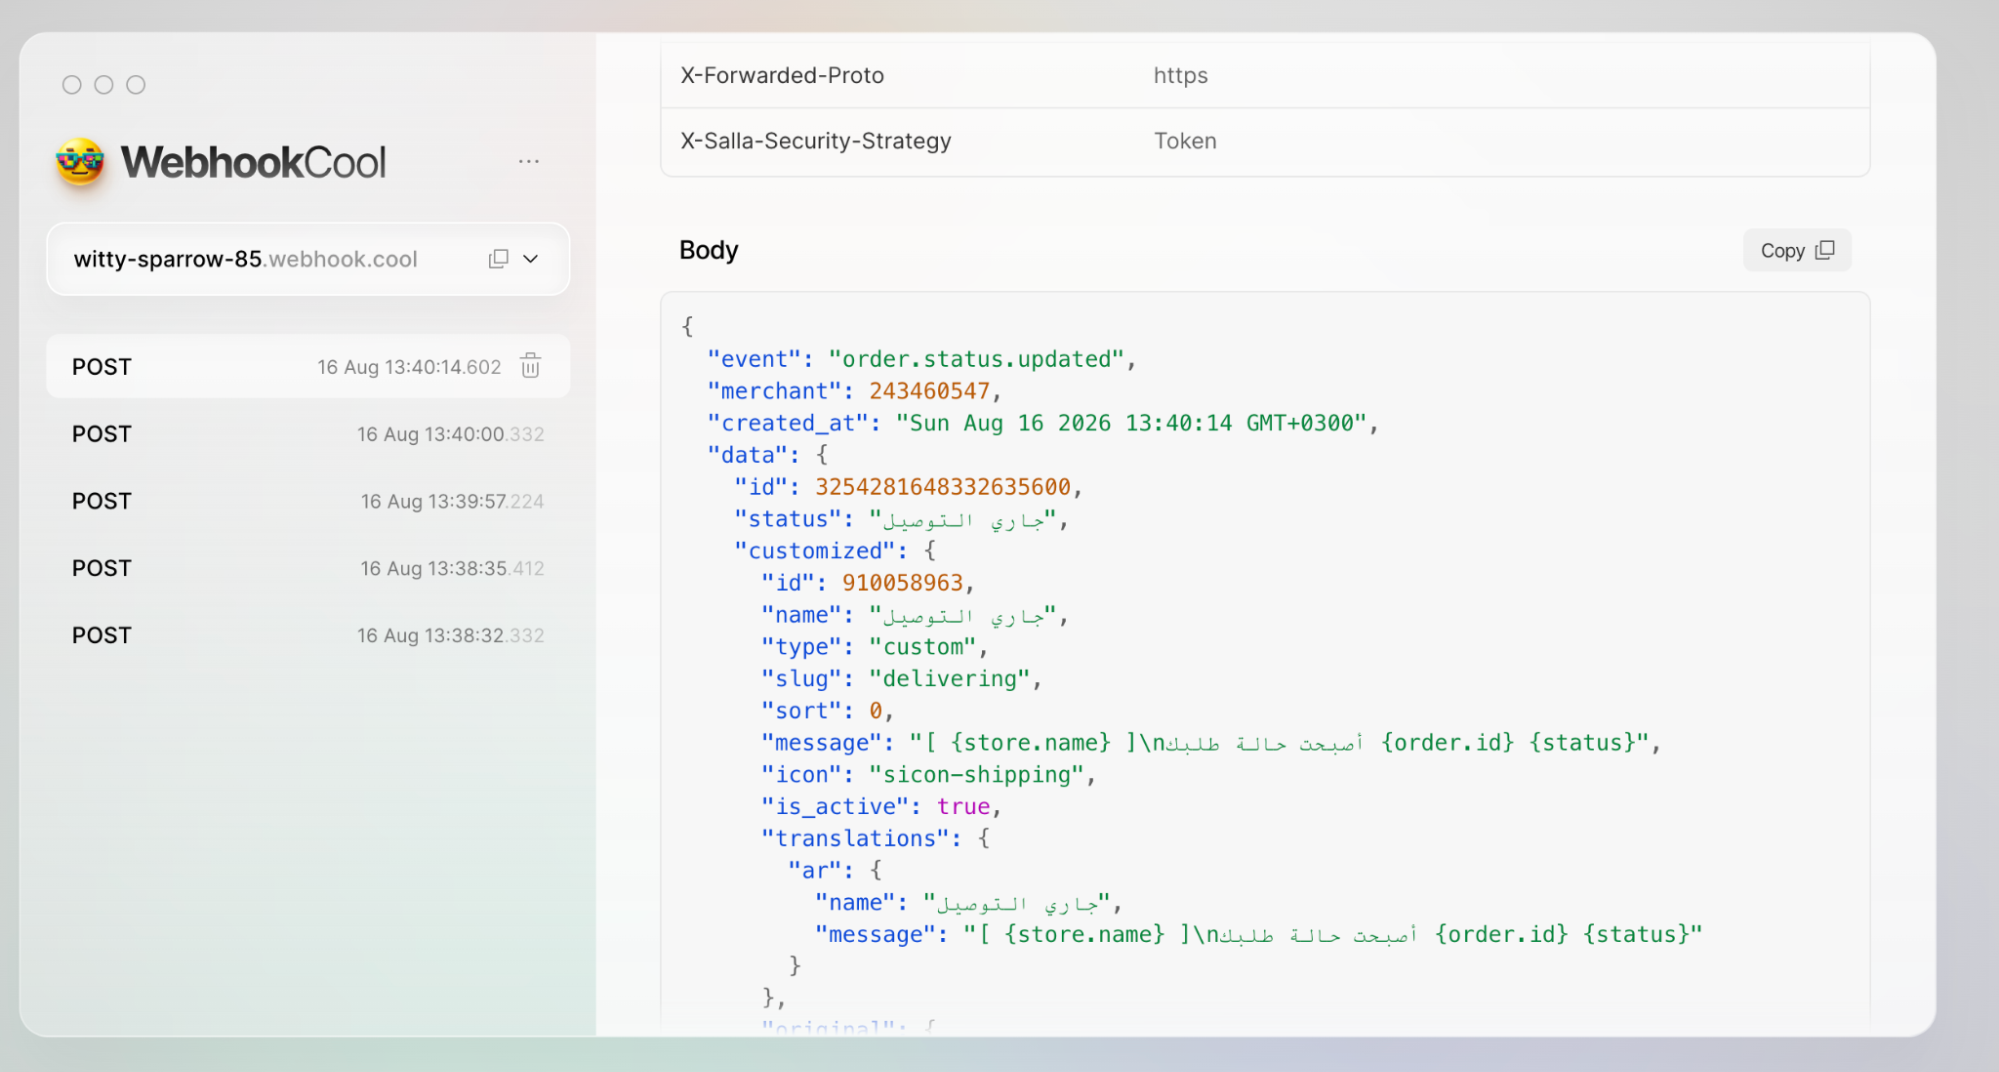
Test webhook delivery by triggering real events on your demo store (place a test order, update a product) and confirming your handler processes them correctly.
Test the uninstall flow explicitly, confirm tokens are revoked and merchant data is cleaned up per your retention policy.
Test error states deliberately, disconnect your database, or simulate a slow third-party API, and confirm your app fails gracefully rather than silently.
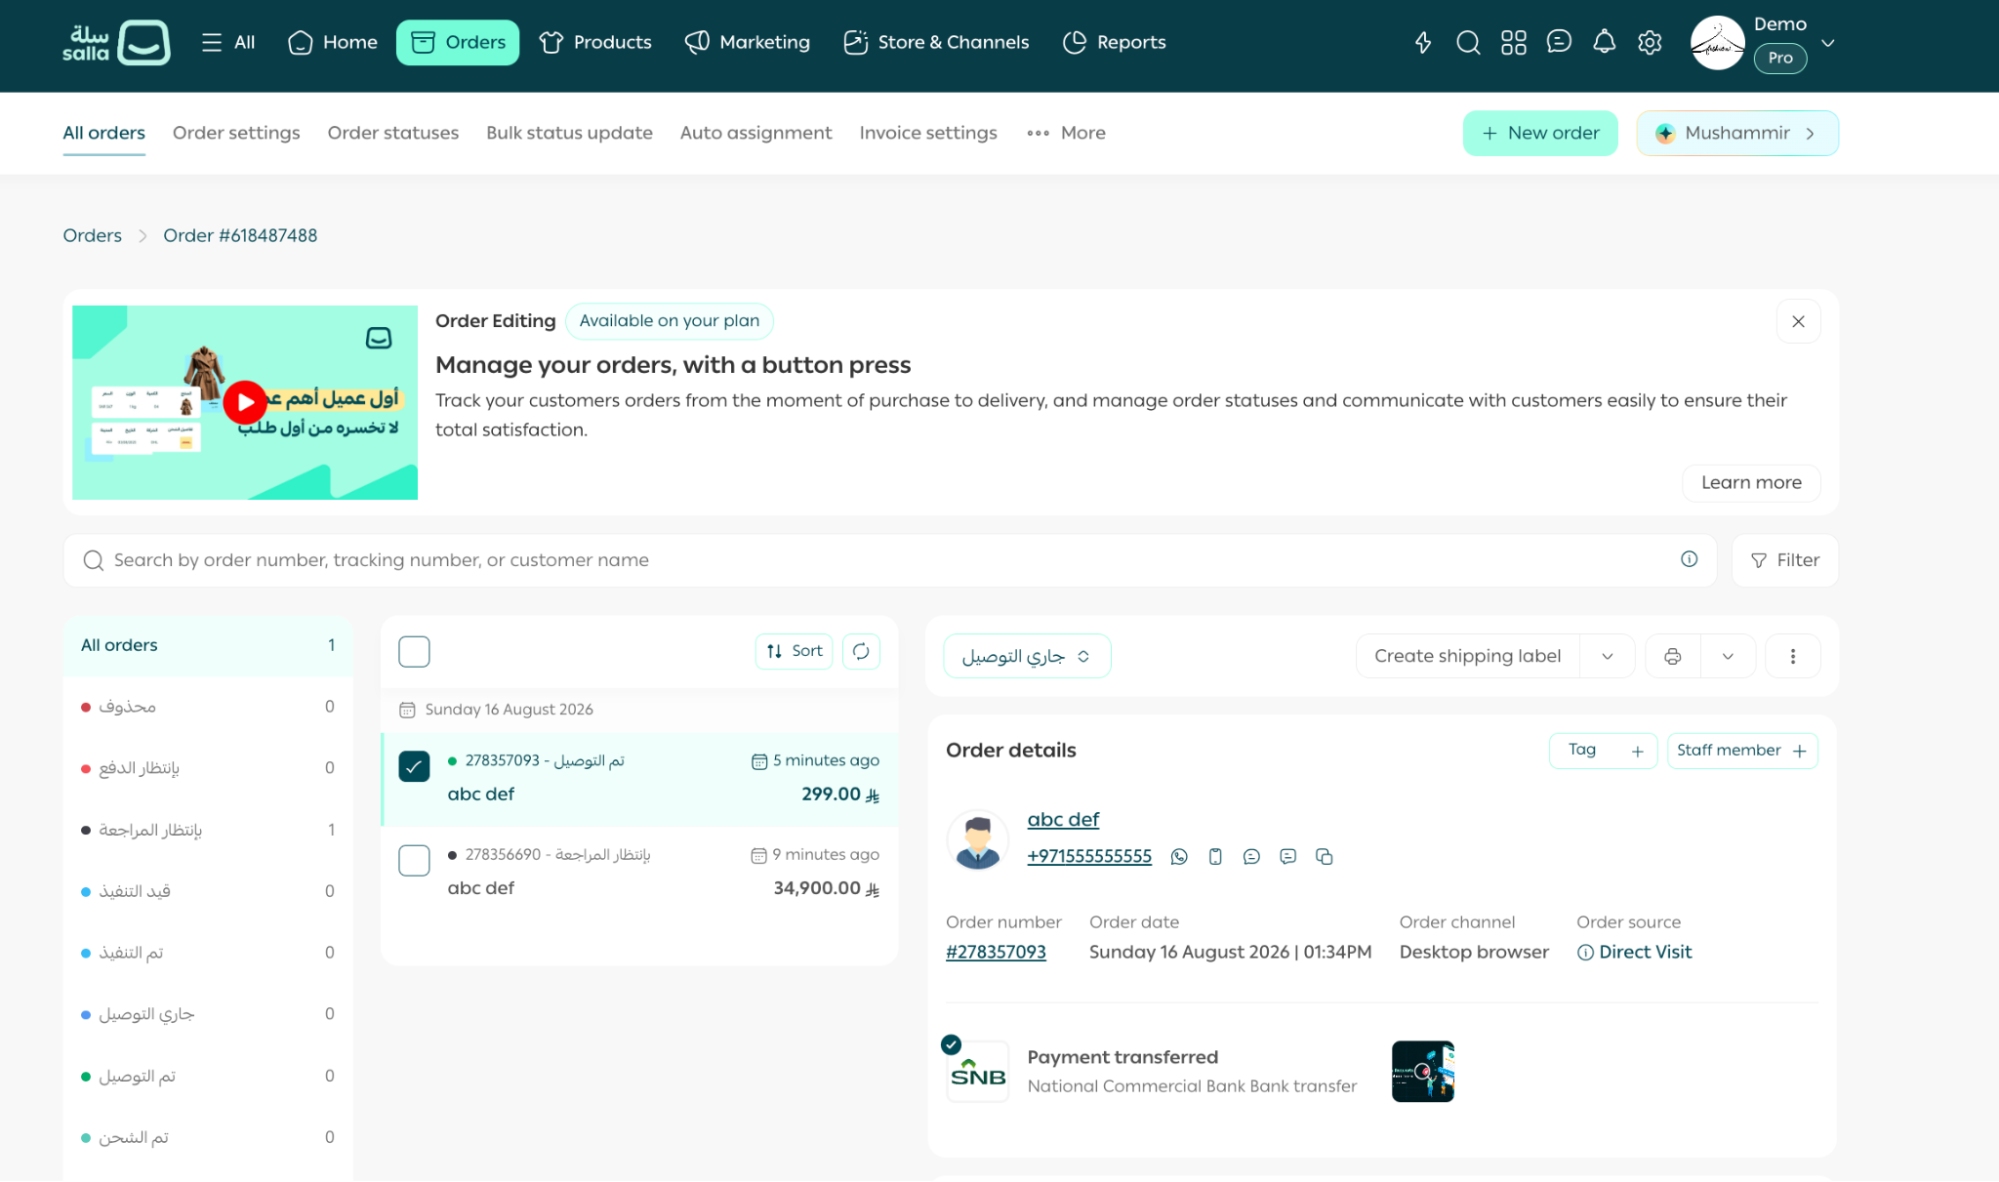
Figure 5.4 - An order in the demo store, used to trigger the webhook test below
Figure 5.5 - Placing a test order on a demo store to verify webhook handling
Where to capture thisThis is not a Partners Portal screen, it is on your demo store's public storefront, not the developer-facing dashboard. Open your demo store's storefront URL, add a product to cart, and complete checkout as a test customer would. That action is what triggers Salla to fire the order.created webhook to your app in the background, this screenshot should capture that checkout/order-confirmation moment, which visually connects the order.created payload example from Development Preparation to the webhook-handling code earlier in this article.
Validate all incoming data (webhook payloads, form submissions, configuration inputs) before processing. Never trust incoming data to be well-formed by default, the signature verification code shown earlier is one layer of this, but you should also validate the shape and types of the payload itself before acting on it.
Design clear, merchant-facing error states for common failure modes (API timeouts, invalid configuration, third-party service outages). Silent failures are the most common source of merchant frustration and support tickets, if something fails, the merchant should see a clear message, not a blank screen or a spinner that never resolves.
Profile your app's slowest interactions (dashboard load time, webhook processing time) before launch. Merchants notice sluggish apps immediately, especially ones embedded in their daily dashboard. A simple starting benchmark: any embedded page load should feel instant (under one second) and any merchant-triggered action should either complete or show progress within two seconds.
Best Practices
Build a pre-submission testing checklist covering install, core feature use, uninstall, and error states (this feeds directly into Publishing Your App's Pre-Launch Checklist).
Test the uninstall flow explicitly, it is the most commonly overlooked path.
Common Mistakes
Testing only the happy path and discovering edge-case bugs after merchants report them.
Treating QA as a final step instead of an ongoing practice throughout development.